User Web Interface
The Overvis MC251 has a built-in web interface for quick-start configuration of general options. You can access this interface using any standard web browser connected to the same network as the device.
Further configuration and monitoring are available at the cloud server.
General options
Section titled “General options”Accessing the Interface
Section titled “Accessing the Interface”- Ensure the MC251 is powered on and connected to your network via Ethernet (uses standard HTTP port 80).
- Find the device’s IP address. You can display the current IP address on the MC251 screen by shortly pressing the R (Service) button.
- Enter this IP address into your web browser’s address bar (e.g.,
http://192.168.1.100).
Note: If your network uses a proxy server, you may need to add the MC251’s IP address to your browser’s exception list to access it locally.
Authentication
Section titled “Authentication”Upon accessing the device, you will be presented with a login page.
 Fig. 1 - The login page
Shortly press the R (Service) button on the device to grant temporary access without a password.
Quick setup
Section titled “Quick setup”After logging in, the Quick setup provides a real-time overview of the device status, allows to configure clock and Internet, and provides firmware update option (if update is available).
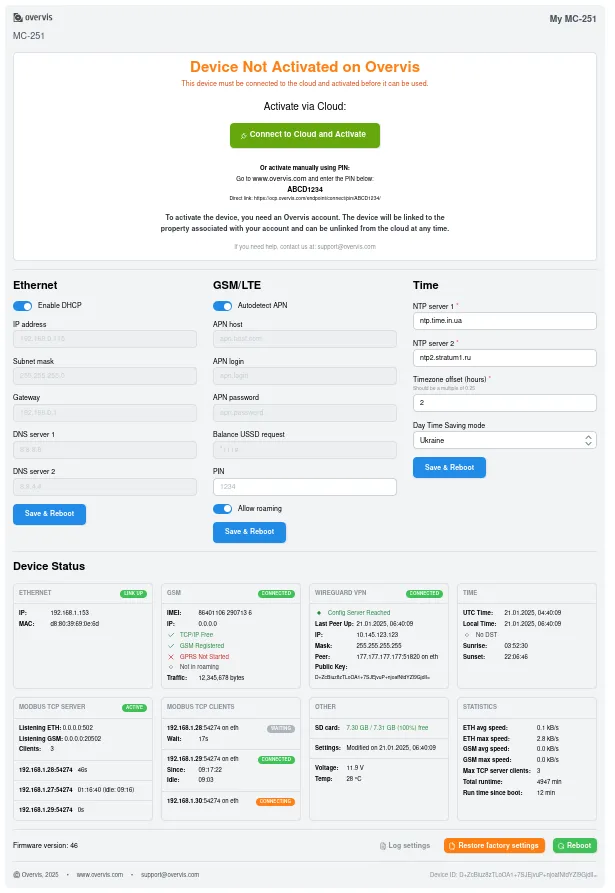 Fig. 2 - The quick setup page
The quick setup displays:
- TCP interface status
- Modbus connection states
- Memory card usage
- Data transfer statistics
- Current system time
- Cloud activation
The quick setup allows the management and configuration for:
- System Time: Configure the internal clock.
- Ethernet: Configure IP addresses, subnet, gateway, and DHCP.
- GSM: Configure APN settings, roaming options and PIN code.
- Cloud VPN Connection: Select the cloud VPN connection method and server address.
- Firmware: Perform firmware upgrades.
Need Help?
Section titled “Need Help?”For technical support and assistance:
- Email: support@overvis.com
- Support portal: www.overvis.com/support