Alerts
Overvis continuously reads parameter values from your devices. An alert lets you define conditions on those readings — and get notified by email, SMS, or voice call when something goes wrong. Alerts also maintain a log of every time a condition was triggered and resolved, giving you an audit trail of incidents.
How alerts work
Section titled “How alerts work”Every alert has three parts:
- Conditions — rules that compare live parameter readings to threshold values. For example, “temperature is above 8°C” or “parameter has a reading error”.
- Actions — notifications to send when conditions become true. You choose the channel (email, SMS, voice call), the recipient, and an optional delay.
- Follow-ups — additional notifications for later stages of the incident: when the alert is confirmed by a person, when it resolves on its own, or when nobody has responded for a while.
Overvis evaluates conditions automatically after each parameter reading cycle. When conditions are met, the alert activates and starts executing actions. When conditions are no longer met, the alert resolves automatically.
Creating an alert
Section titled “Creating an alert”Navigate to Alerts in the sidebar and click Add alert. The alert form has the sections described below.
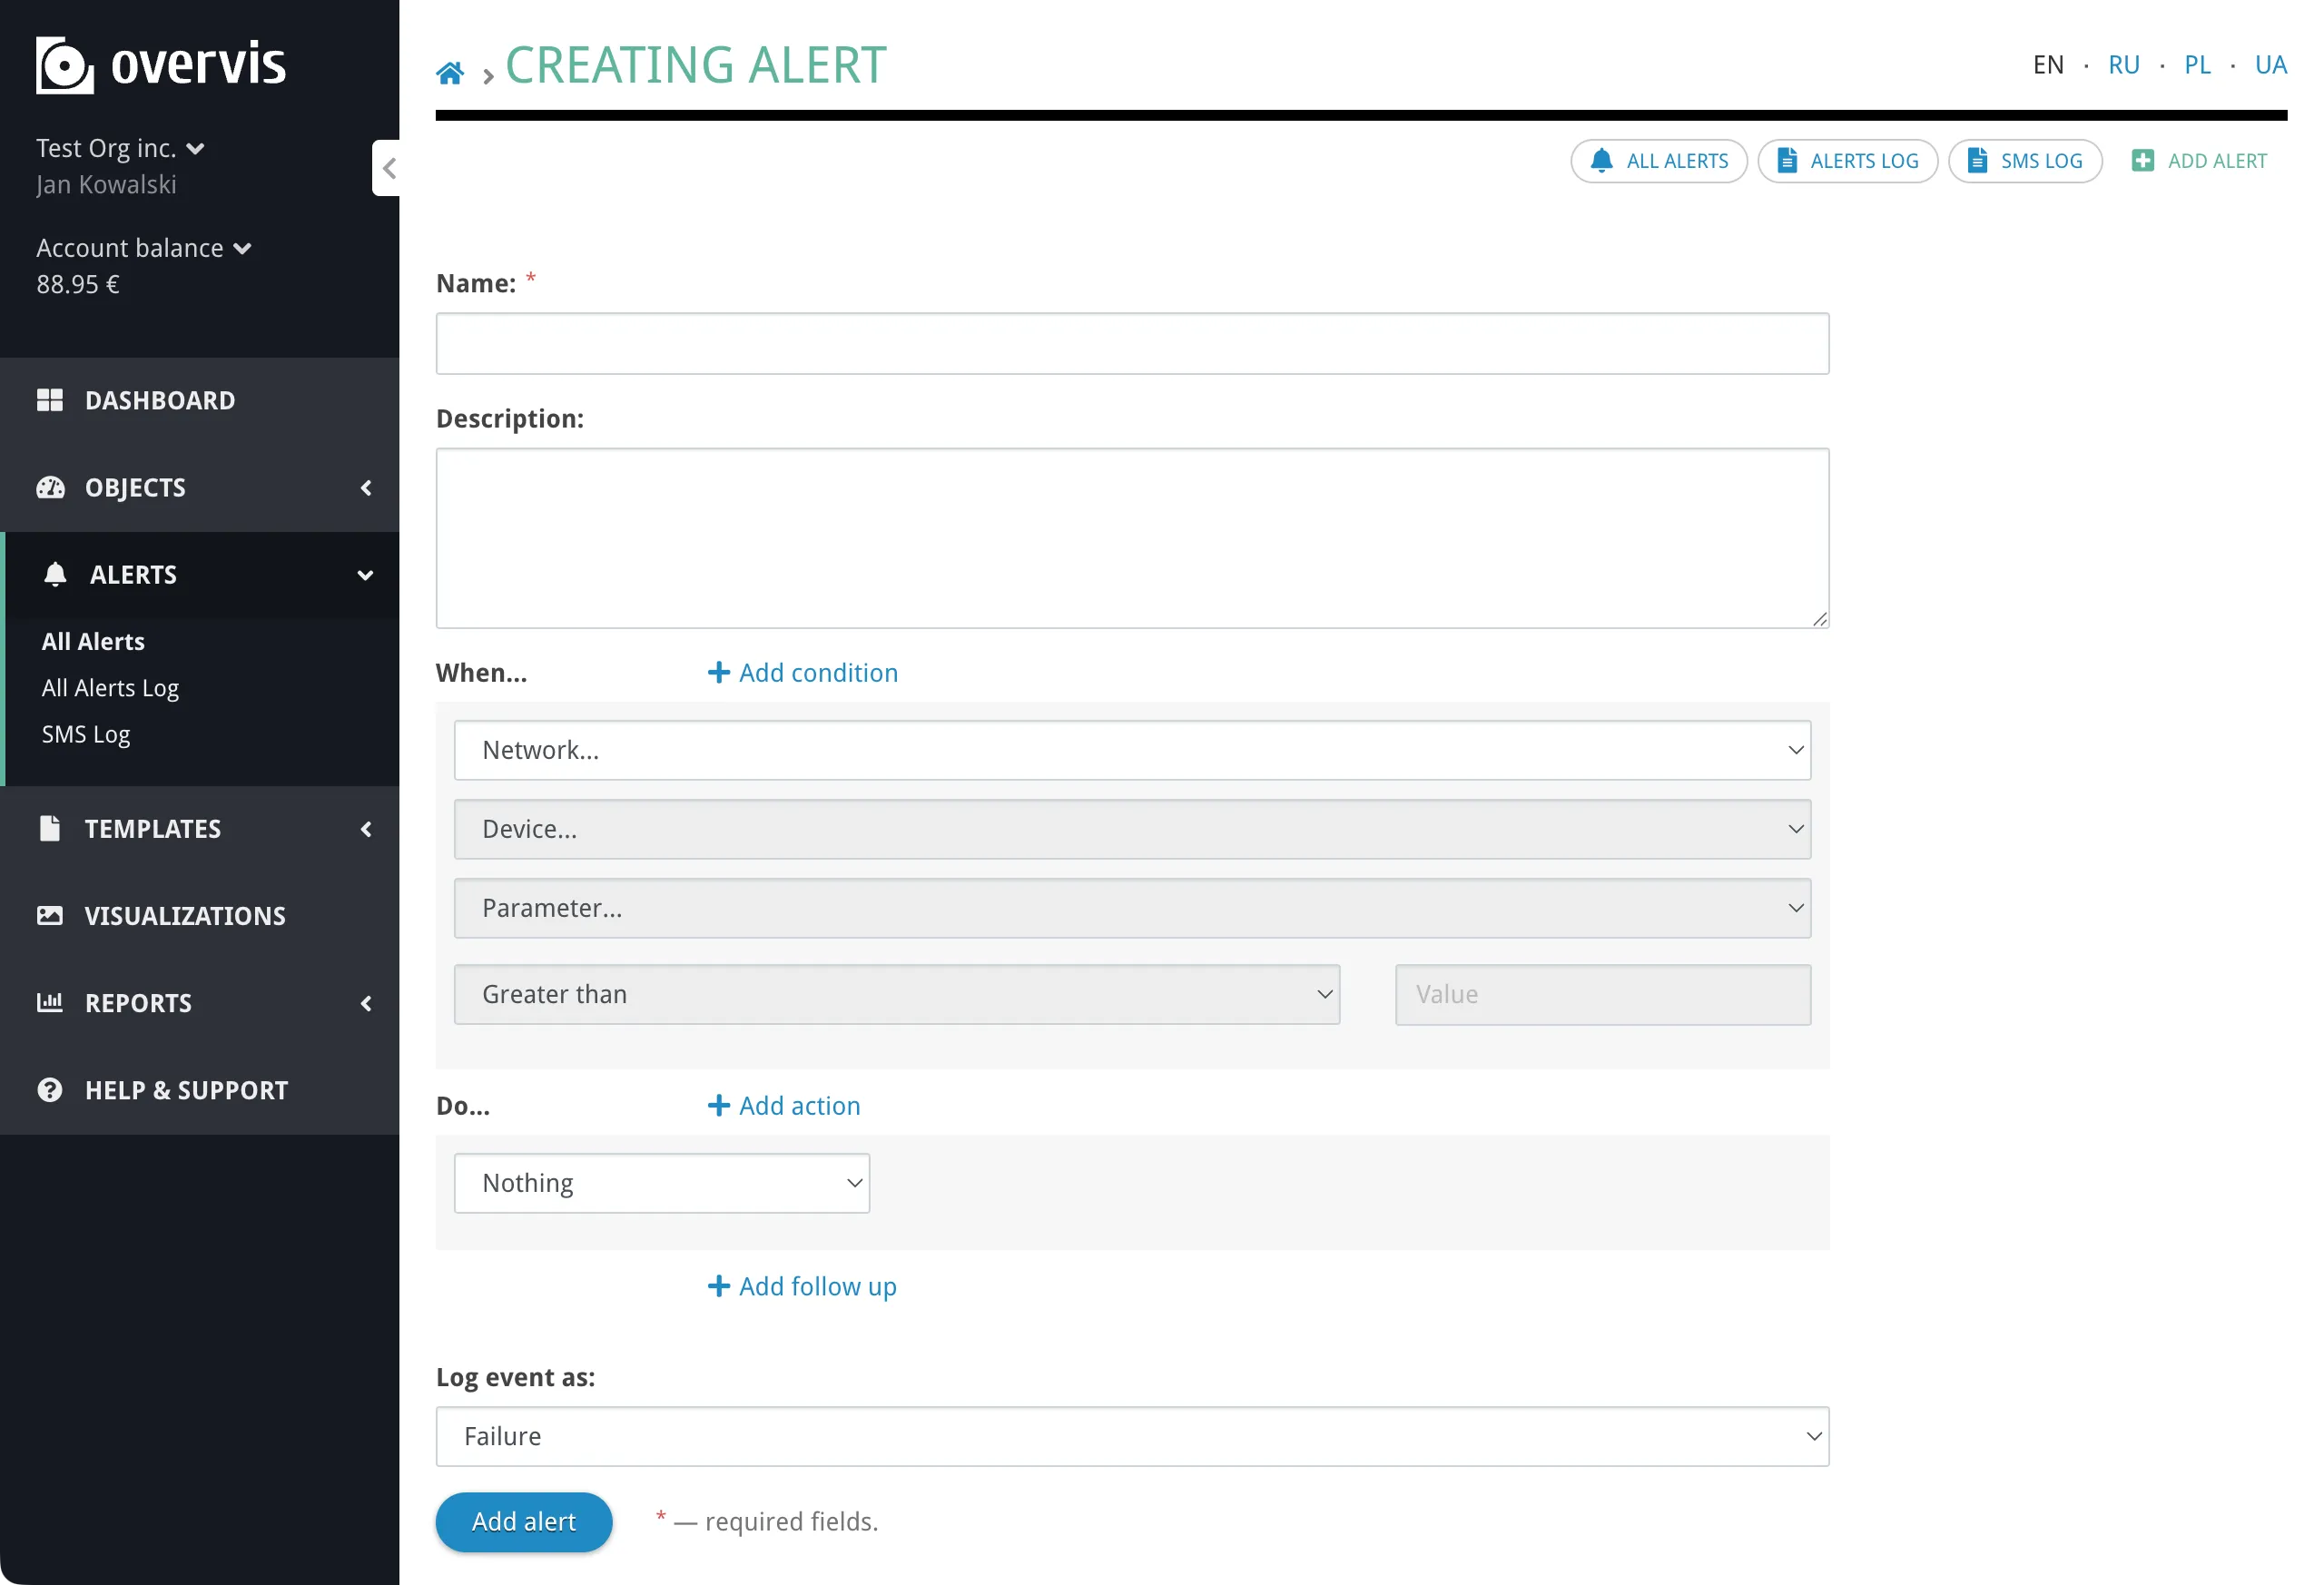
Name and description
Section titled “Name and description”Give the alert a descriptive name (e.g. “Cold room temperature too high”). The name appears in notifications and in the alert log, so it should be immediately understandable to whoever receives the message. The name can be up to 200 characters long.
The description is optional and can contain additional context.
Conditions — “When…”
Section titled “Conditions — “When…””Each condition monitors one device parameter and compares its value to a threshold.
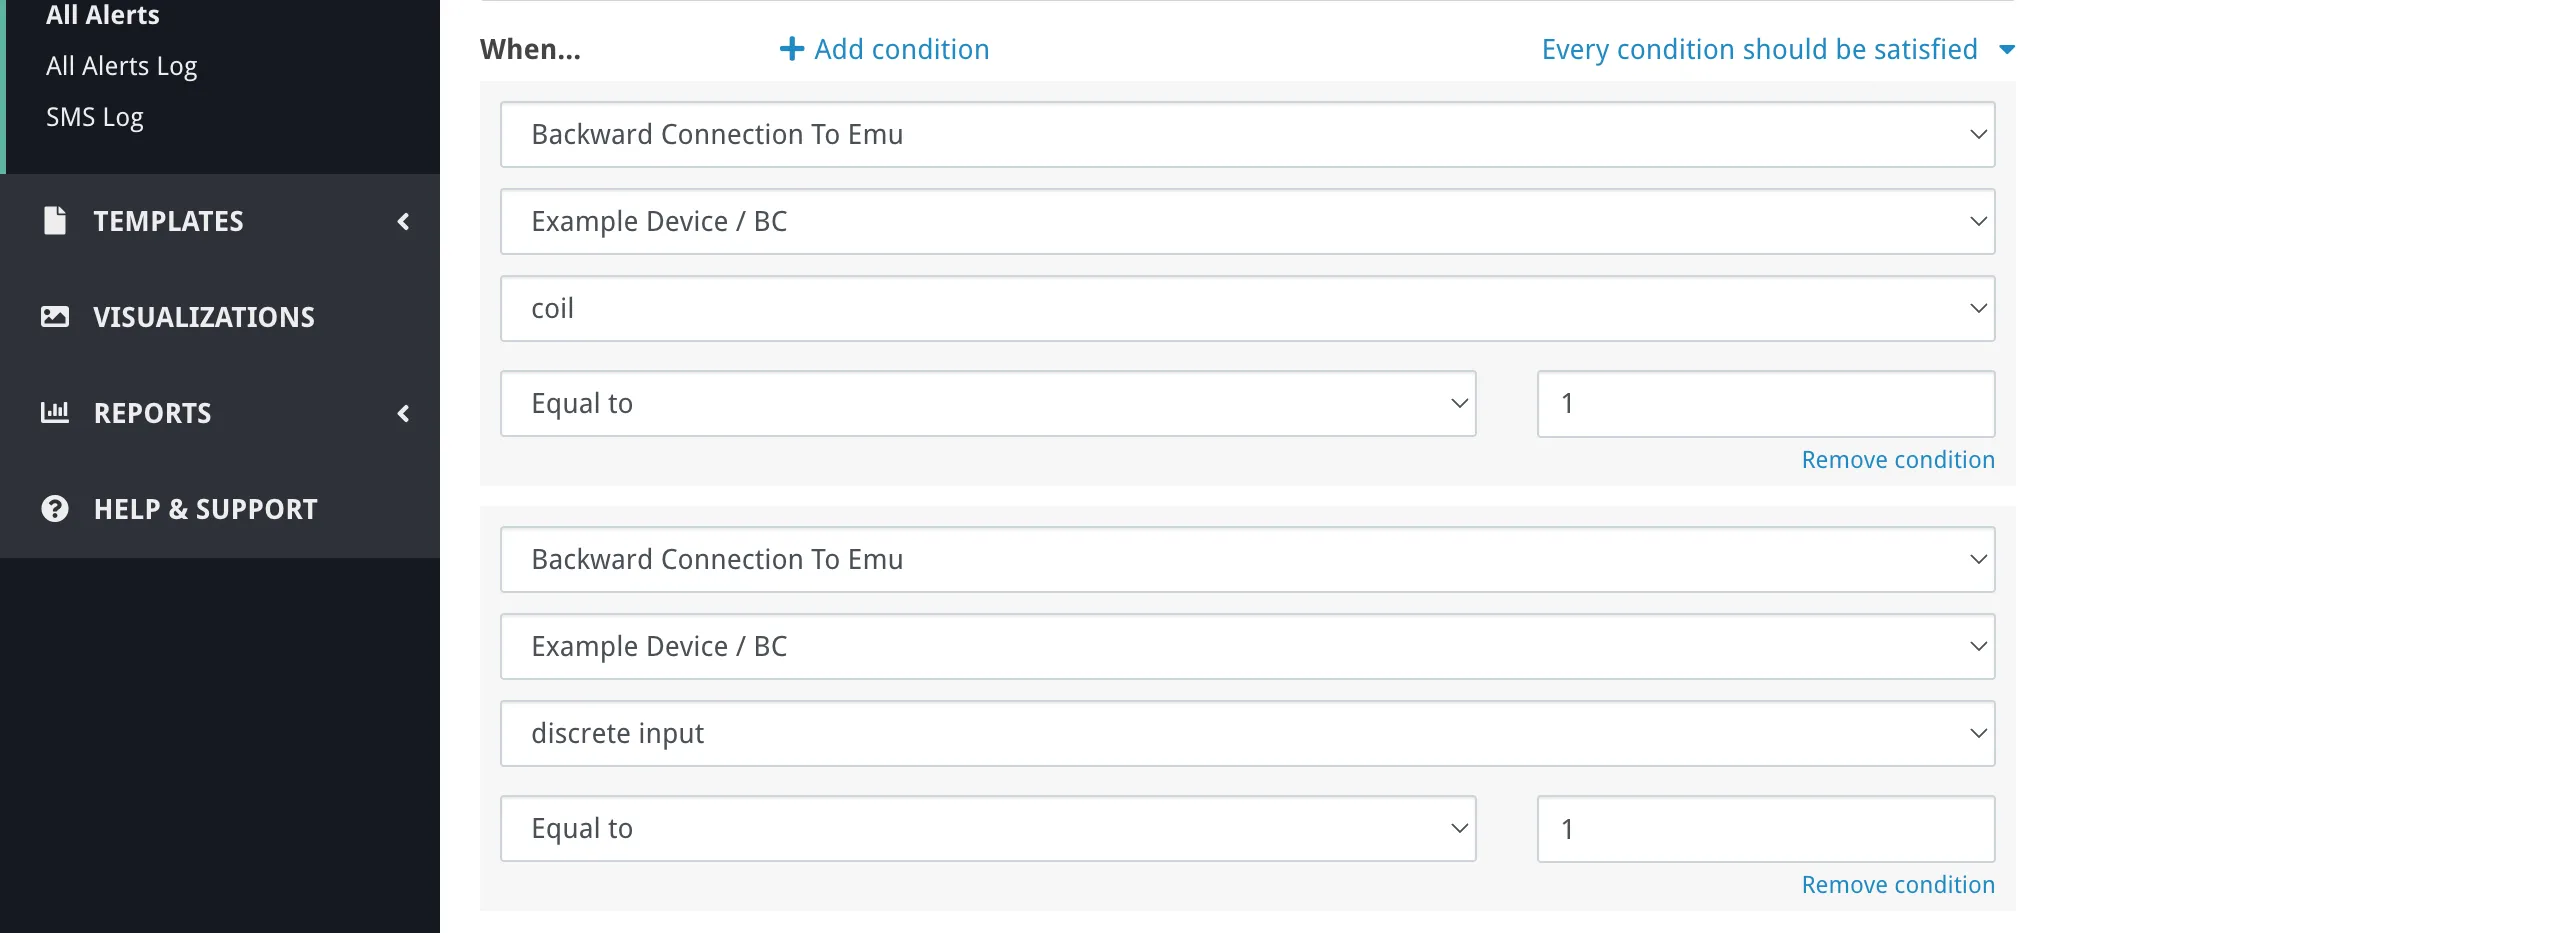
To add a condition, select a network, then a device on that network, then a parameter on that device. Only tracked parameters are available — untracked parameters are not polled, so there is nothing to compare.
Next, choose a comparison operator and enter a threshold value:
| Operator | Meaning |
|---|---|
| Greater than | Value > threshold |
| Greater or equal to | Value ≥ threshold |
| Less than | Value < threshold |
| Less or equal to | Value ≤ threshold |
| Equal to | Value = threshold |
| Not equal to | Value ≠ threshold |
| Has reading error | Parameter could not be read (no threshold needed) |
The threshold is compared against the parameter’s displayed value — the value after any multiplier defined in the parameter settings has been applied. Enter the threshold in the same engineering units you see on the device page (e.g. °C, kW), not in raw register values.
“Has reading error” is a special condition that triggers when the parameter cannot be read at all — for example, the device is offline, or the Modbus address is invalid. No threshold value is needed. To avoid false positives during system startup, reading error conditions are silenced for approximately 2 minutes after the system starts.
Condition logic. If an alert has multiple conditions, you choose how they combine:
- Every condition should be satisfied (AND) — the alert activates only when all conditions are true simultaneously.
- Any condition triggers the event (OR) — the alert activates when at least one condition is true.
Actions — “Do…”
Section titled “Actions — “Do…””Actions define what happens when the alert activates. Each action specifies:

- Channel: Email, SMS, or Voice call.
- Recipient: An email address or phone number. Leave empty to use the organization’s default notification email or phone (configured in organization settings). If the recipient is left empty and no default is configured, the notification is skipped.
- Delay: How long to wait before sending the notification. Options range from “Immediately” to “If not resolved in 2 hours”.
The delay is useful to avoid false alarms from brief fluctuations. If the alert resolves before the delay expires, the notification is never sent.
Follow-ups — “Follow up…”
Section titled “Follow-ups — “Follow up…””Follow-up actions let you escalate or notify at later stages of an incident:
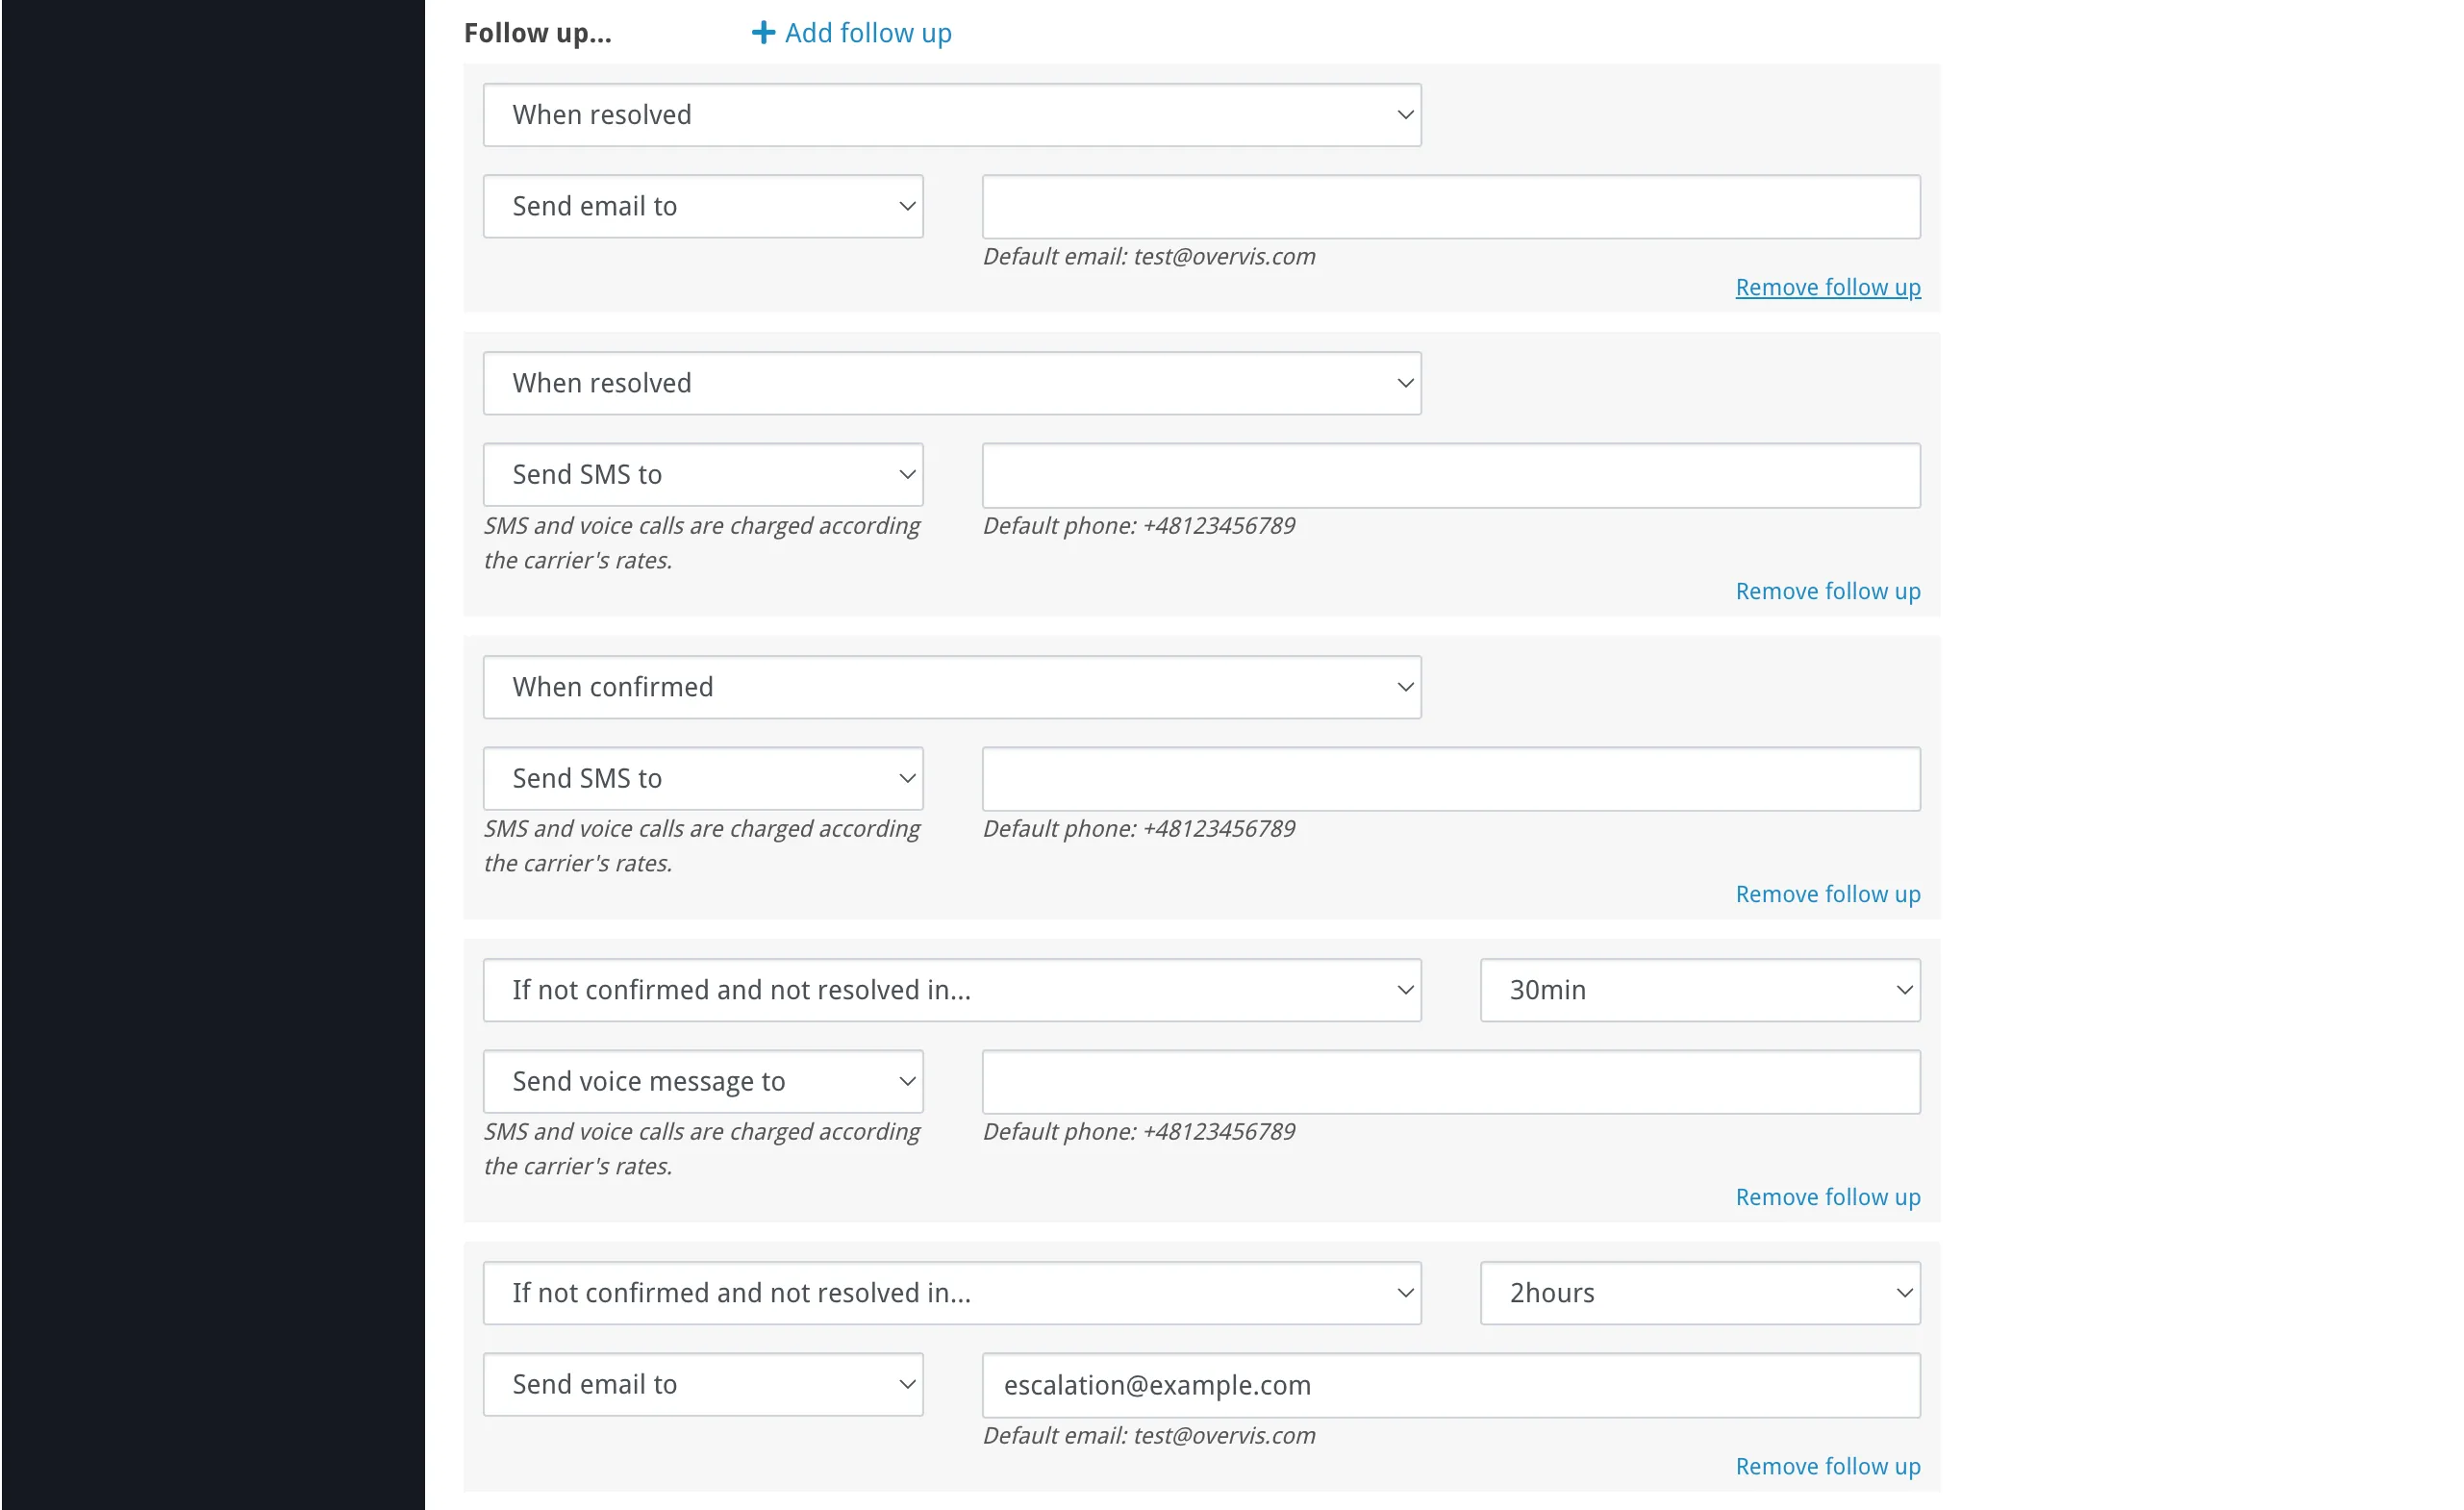
| Stage | Meaning |
|---|---|
| When resolved | The conditions are no longer met and the alert deactivated on its own. Use this to notify that the situation has returned to normal. |
| When confirmed | Someone has acknowledged the alert (see Confirming alerts below). Use this to notify the team that the issue is being handled. |
| If not confirmed and not resolved in… | Nobody has acknowledged the alert within the specified time. Use this for escalation — for example, call a manager if the original SMS was not confirmed within 30 minutes. |
For the “not confirmed” stage, you select a timeout (from 5 minutes to 48 hours). If the alert is confirmed or resolves before this timeout, the follow-up notification is cancelled.
Each follow-up specifies a channel (email / SMS / voice call) and a recipient, same as actions.
Log event as
Section titled “Log event as”Log event as controls how the alert appears in the alert log and on the dashboard:

| Level | Use for |
|---|---|
| Don’t log | Notification-only alerts that don’t need to appear in the log. |
| Info | Informational events (e.g. a door was opened). |
| Warning | Conditions that need attention but are not urgent (e.g. temperature approaching a limit). |
| Failure | Equipment malfunction or communication loss. This is the default for new alerts. |
| Critical failure | Situations requiring immediate intervention (e.g. freezer failure, safety alarm). |
The level also determines the color of the bell icon on the alerts overview page when the alert is active.
Alert lifecycle
Section titled “Alert lifecycle”An alert goes through the following stages:
flowchart LR
    A["Inactive<br/>(monitoring)"] -->|"Conditions<br/>met"| B["Active<br/>(notifications sent)"]
    B -->|"User<br/>confirms"| C["Confirmed"]
    B -->|"Conditions<br/>clear"| D["Resolved"]
    C -->|"Conditions<br/>clear"| D
    D -.->|"Ready for<br/>next incident"| A
- Inactive — conditions are not met. The alert is monitoring but has not triggered.
- Active — one or more conditions became true (depending on the AND/OR logic). Overvis creates an alert record in the log and begins executing “Do…” actions. A confirmation code is generated. If “If not confirmed and not resolved in…” follow-ups are configured, their escalation timers begin counting down.
- Confirmed — someone acknowledged the alert via email link or SMS reply (see below). “When confirmed” follow-ups execute, and any pending escalation timers are cancelled.
- Resolved — the conditions are no longer true. Overvis closes the alert record and executes “When resolved” follow-ups (if a “started” notification was sent). Any remaining pending actions are cancelled. The alert returns to Inactive and is ready to activate again on the next incident.
While the alert is Active and unconfirmed, escalation follow-ups (“If not confirmed and not resolved in…”) fire at their configured timeouts. This is not a separate state — the alert remains Active, and escalation can happen multiple times with different timeouts (e.g. SMS after 15 minutes, voice call after 1 hour).
Each time an alert activates and later resolves, a separate alert record is created in the log. An alert can only have one active (unresolved) record at a time.
Confirming alerts
Section titled “Confirming alerts”When an alert fires, notifications include a way for the recipient to confirm (acknowledge) the alert:
- Email notifications contain a confirmation link. Clicking it opens a page that confirms the alert and shows the event details.
- SMS notifications include a 5-digit confirmation code. Reply with this code to the same number to confirm.
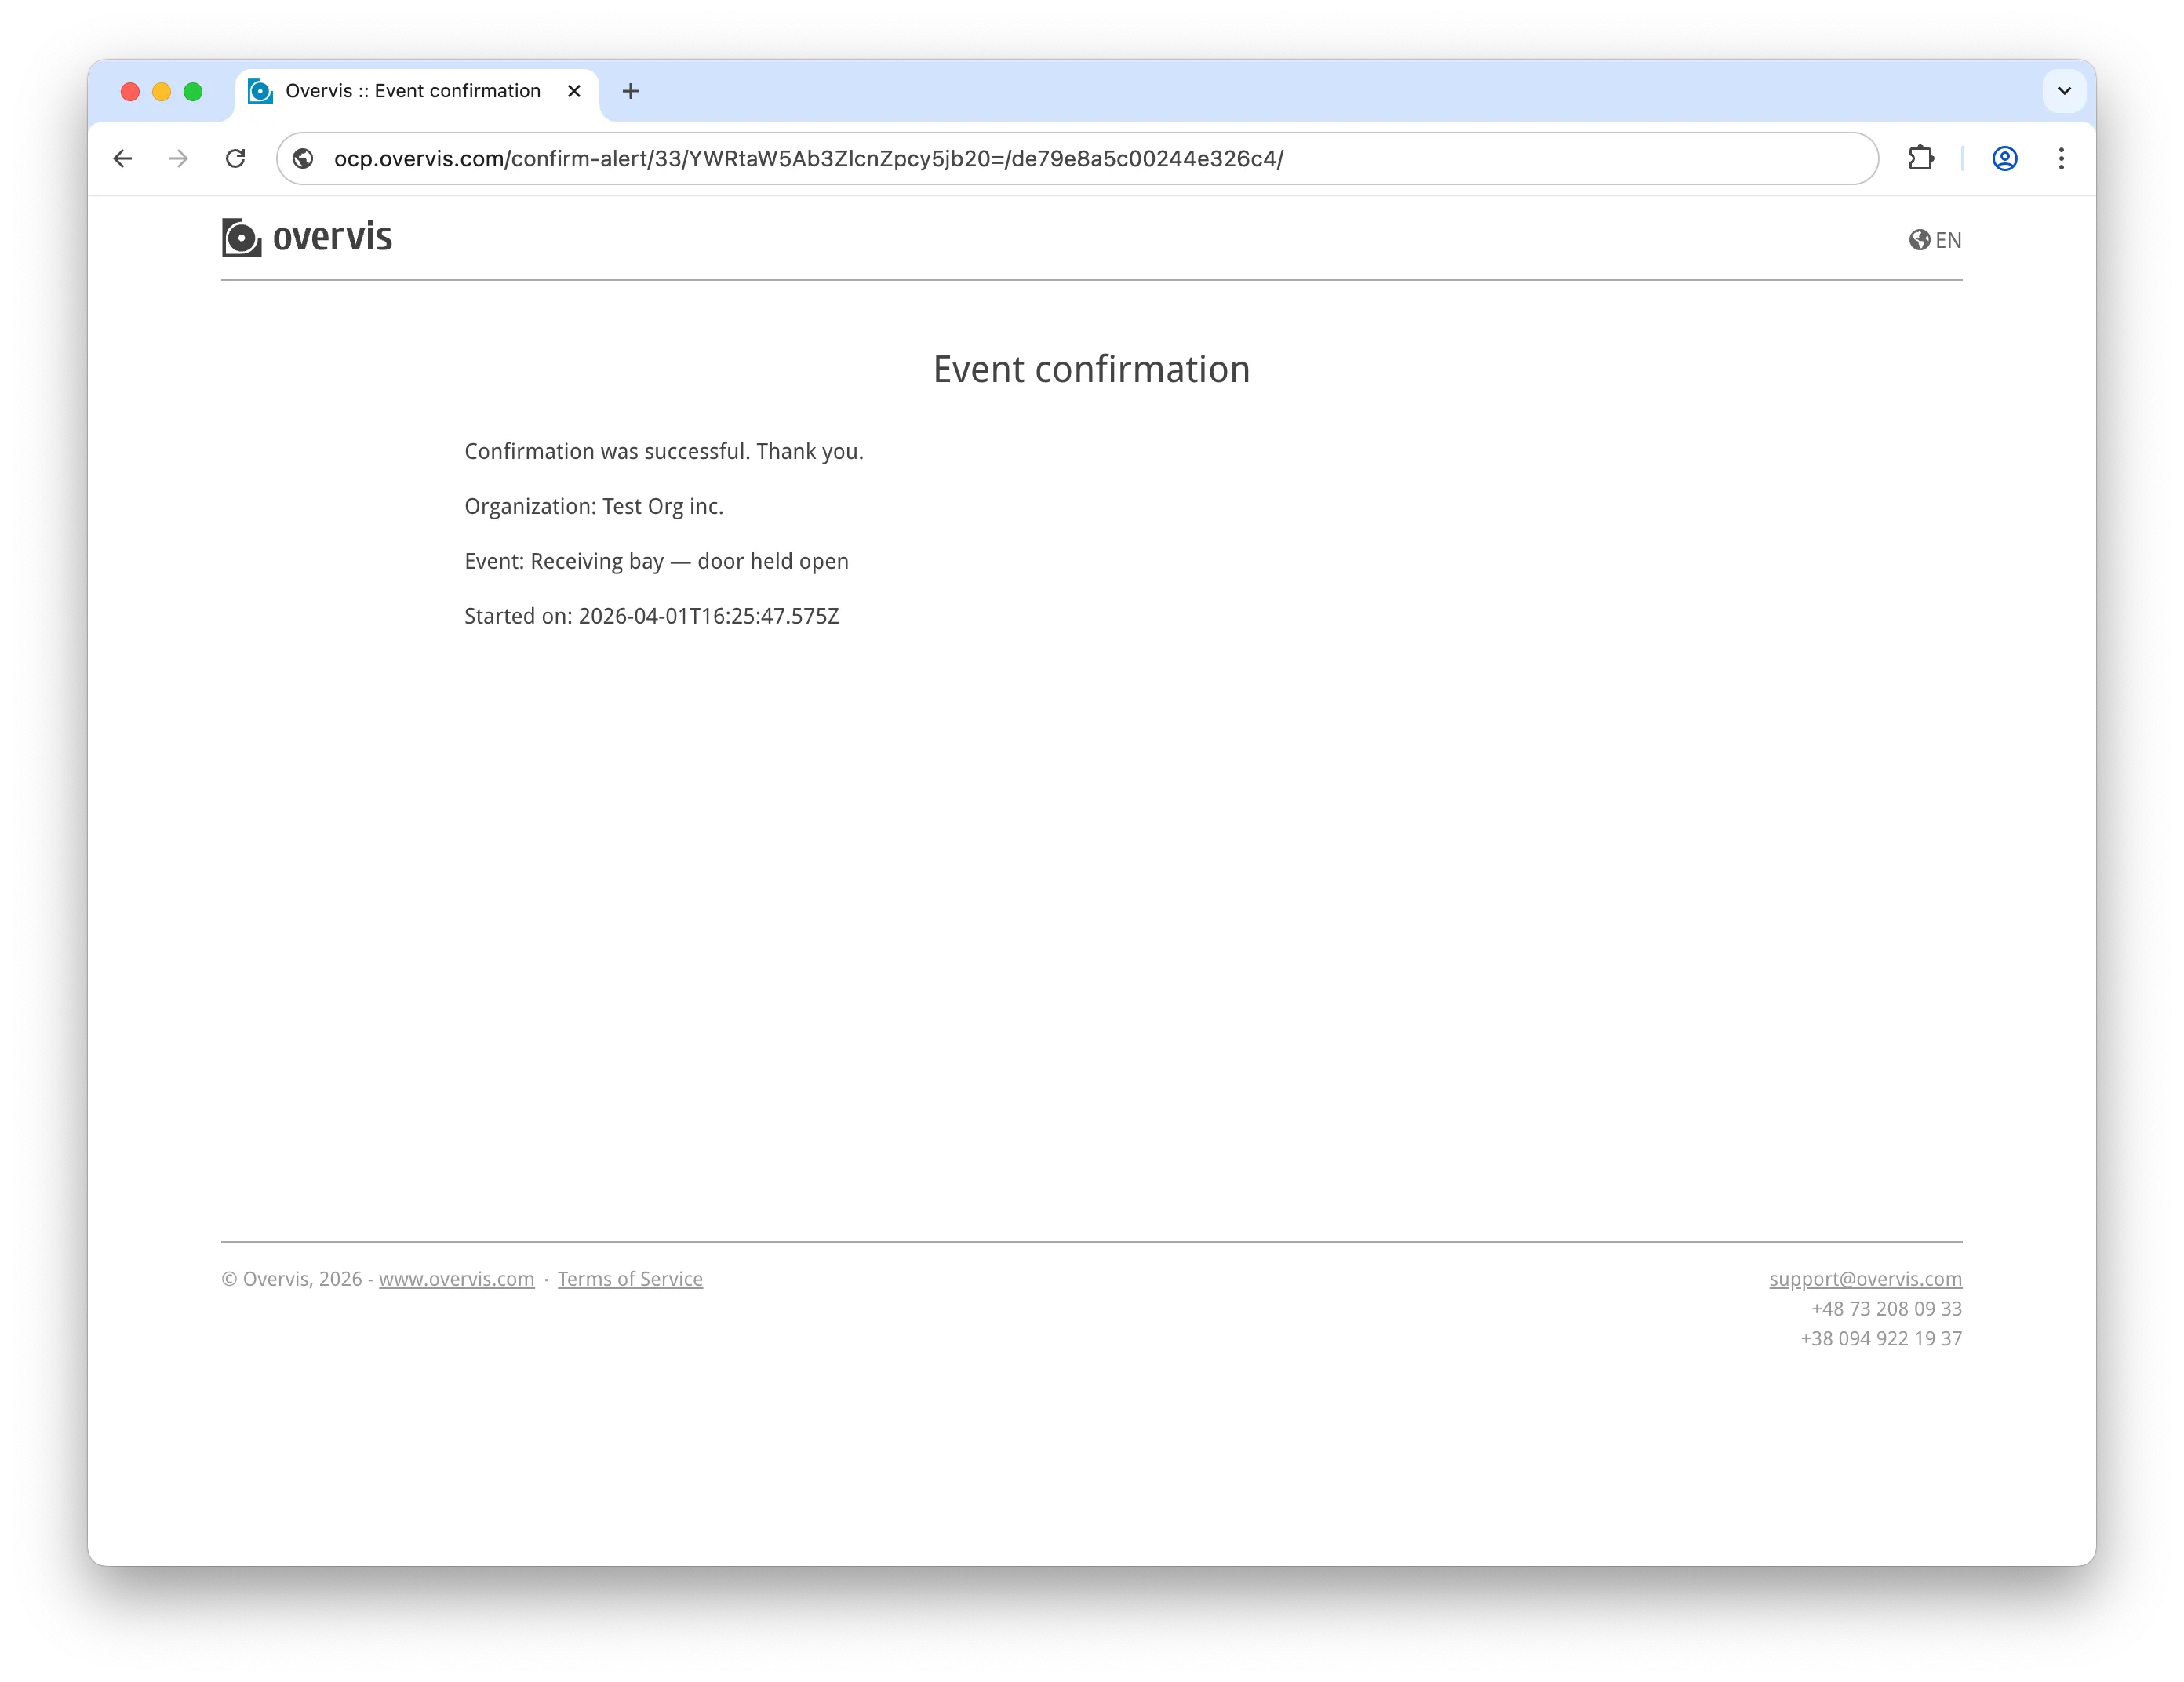
Confirmation serves two purposes:
- It triggers any “When confirmed” follow-up actions (e.g. notifying the team that someone is handling the issue).
- It cancels any pending “If not confirmed” escalation actions.
Once confirmed, the alert remains active until the conditions clear and it resolves automatically. Confirmation does not silence or resolve the alert — it only signals that a person is aware of the problem.
Alerts overview page
Section titled “Alerts overview page”The Alerts page lists all alerts in the current organization. For each alert, you can see:
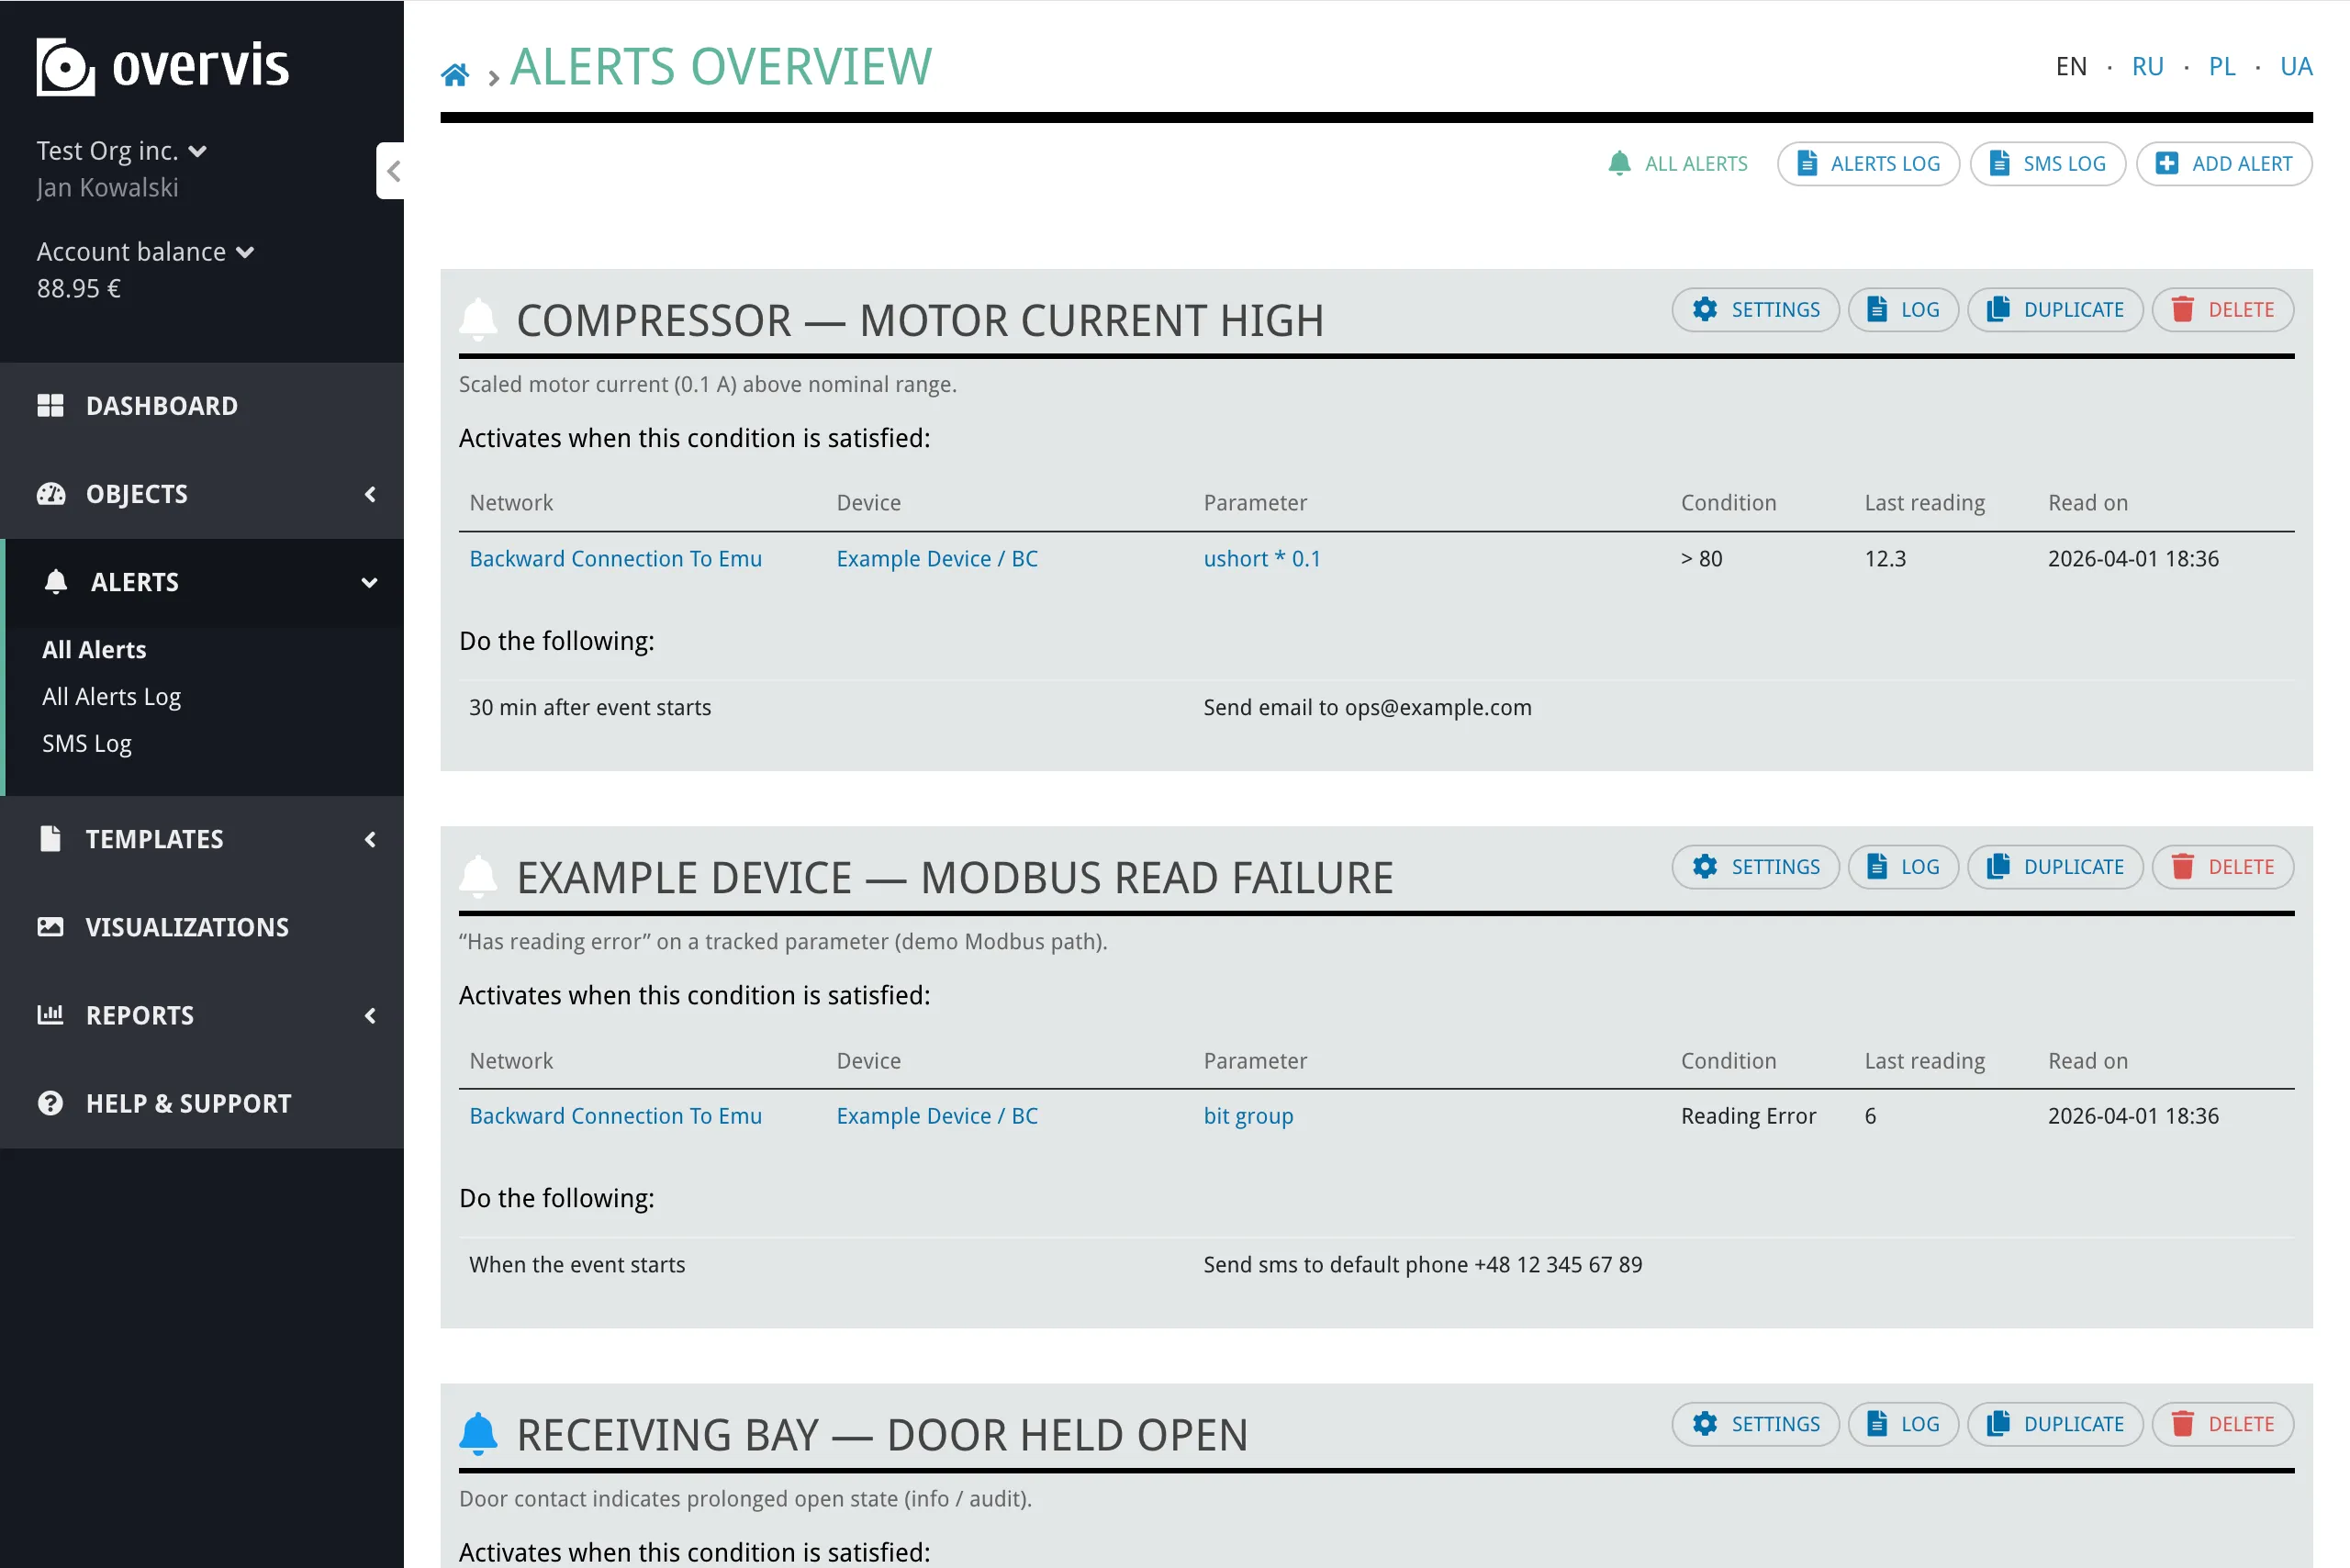
- The alert name and description.
- A bell icon colored by log level. If the alert is currently active, the icon is highlighted.
- A conditions table showing the network, device, parameter, condition, last reading value, and reading timestamp for each condition. Triggered conditions are visually highlighted.
- An actions summary listing what notifications are configured.
From this page, you can access each alert’s Settings, Log, Duplicate, or Delete actions.
Alert log
Section titled “Alert log”The alert log records every time an alert activated and resolved. There are two views:
- Organization-wide log (Alerts → Alerts Log in the sidebar) — shows all alert records across all alerts, newest first.
- Per-alert log (open an alert → Log) — shows records for a single alert only.
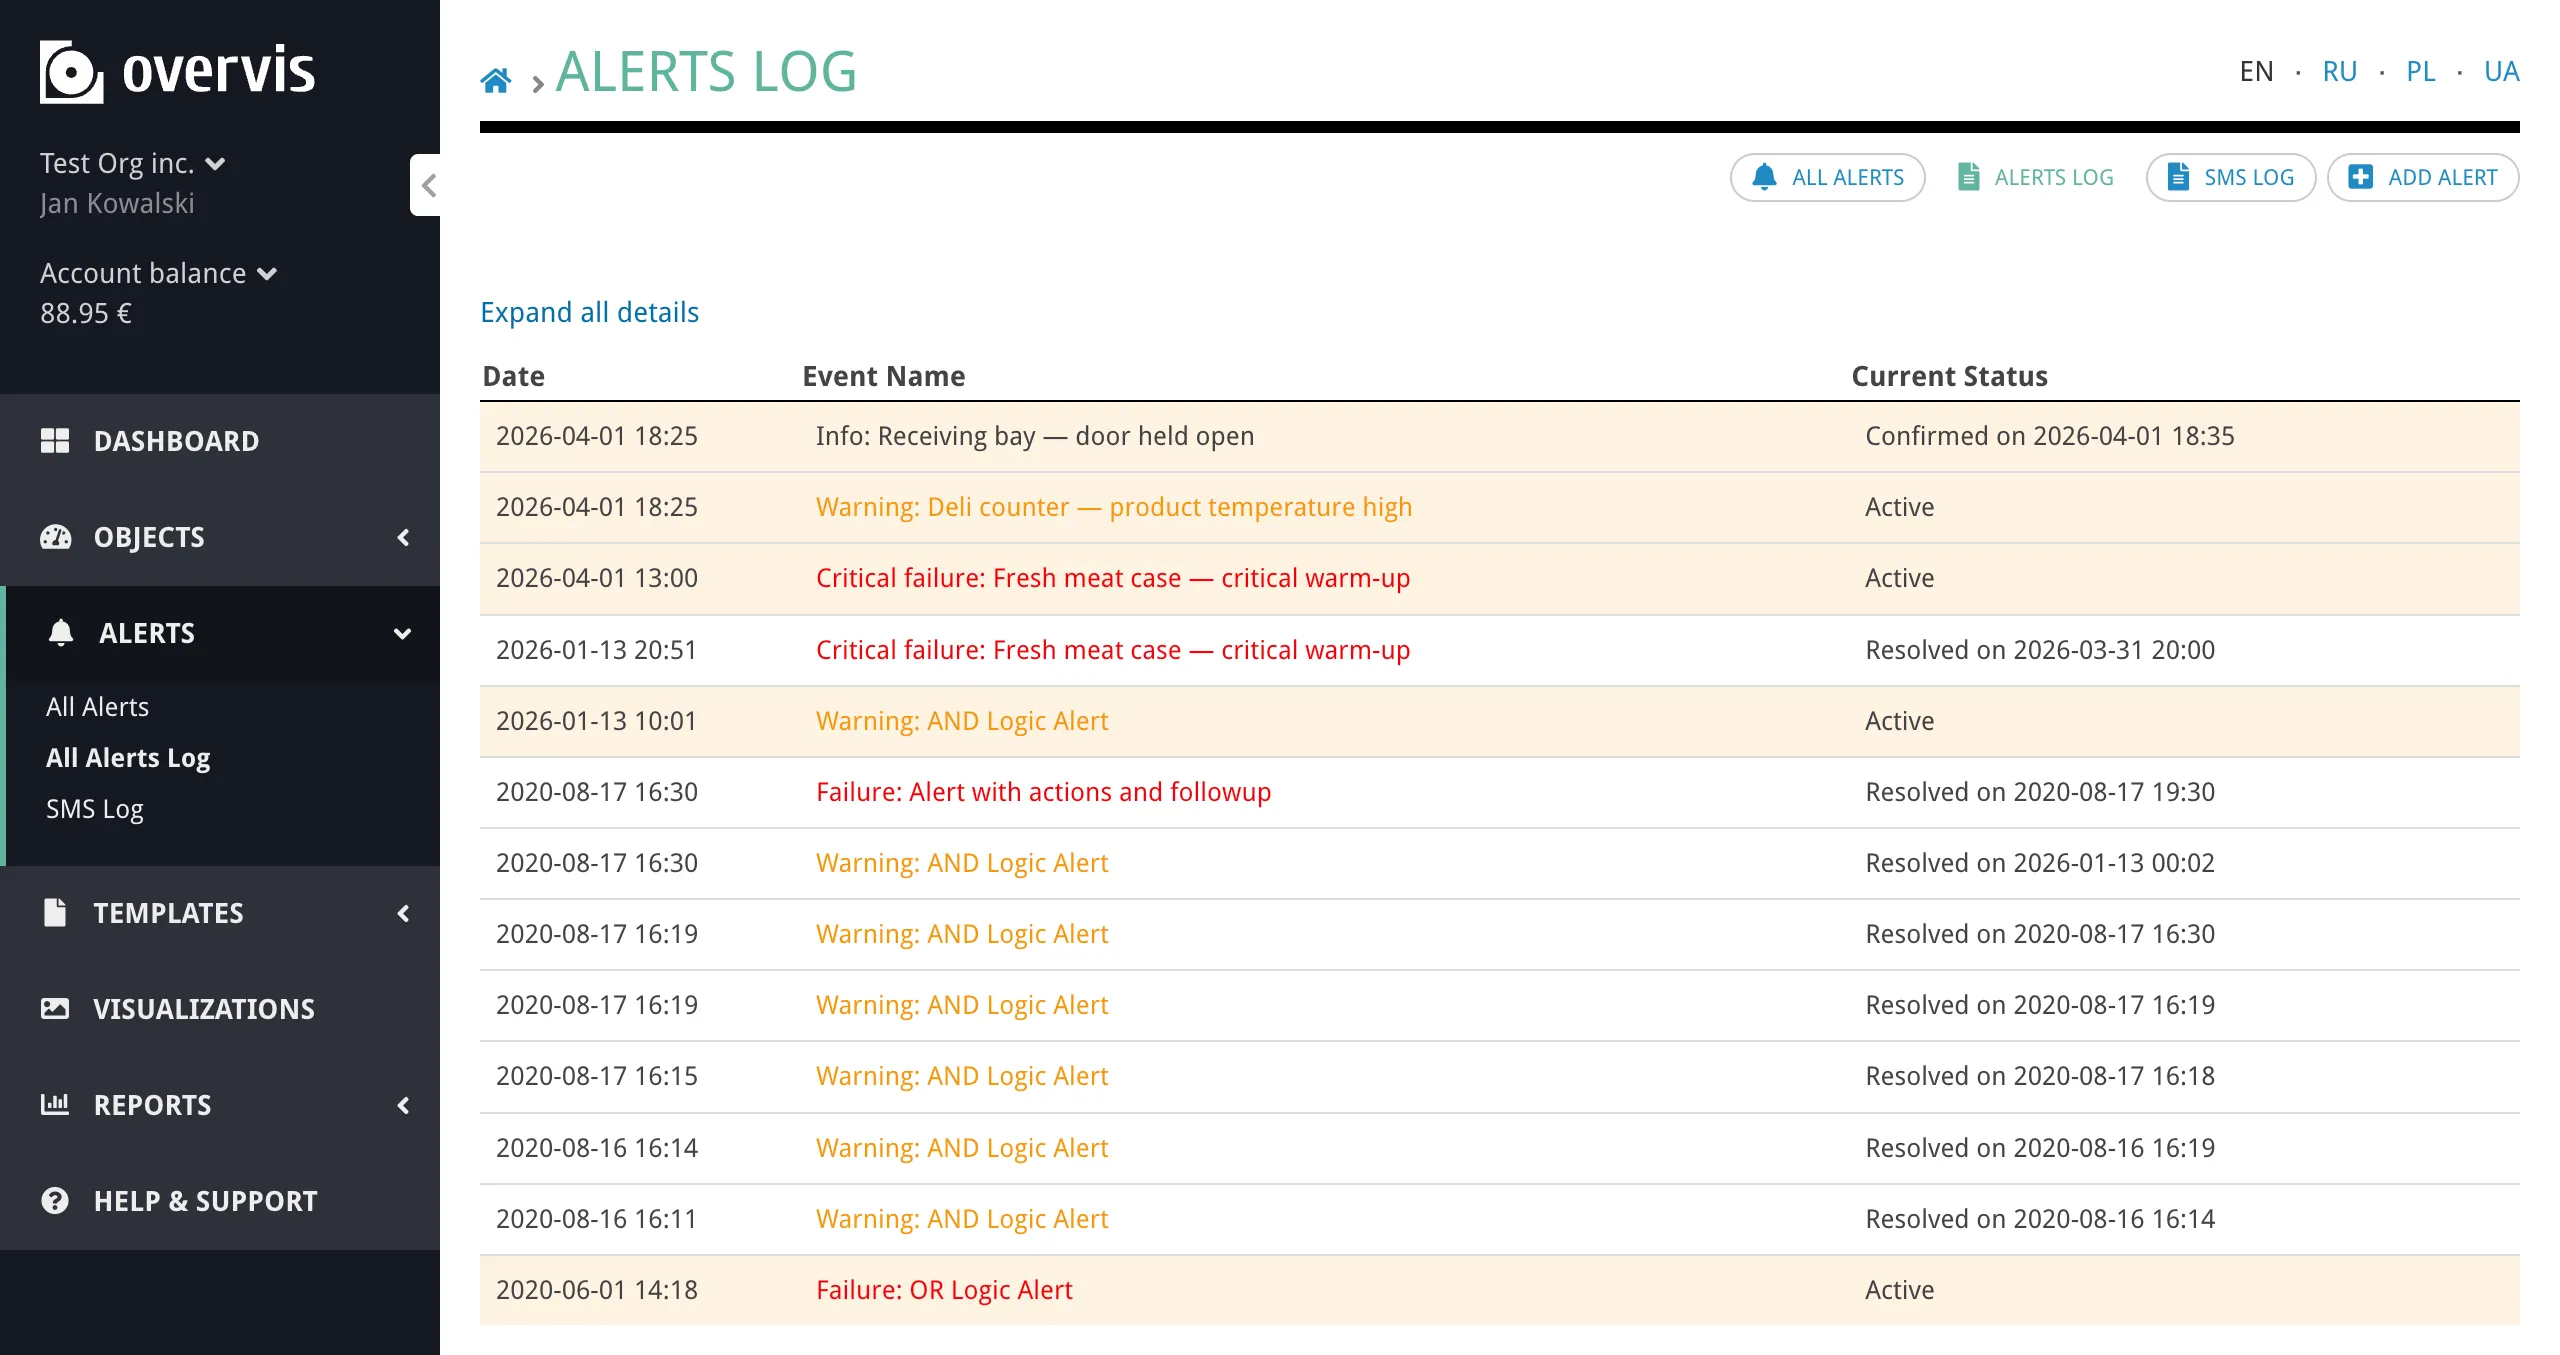
Each log entry shows:
| Column | Content |
|---|---|
| Date | When the alert activated. |
| Event Name | The alert name, prefixed by log level (e.g. “Warning: Cold room temperature too high”). |
| Current Status | Active, Confirmed on (date), or Resolved on (date). |
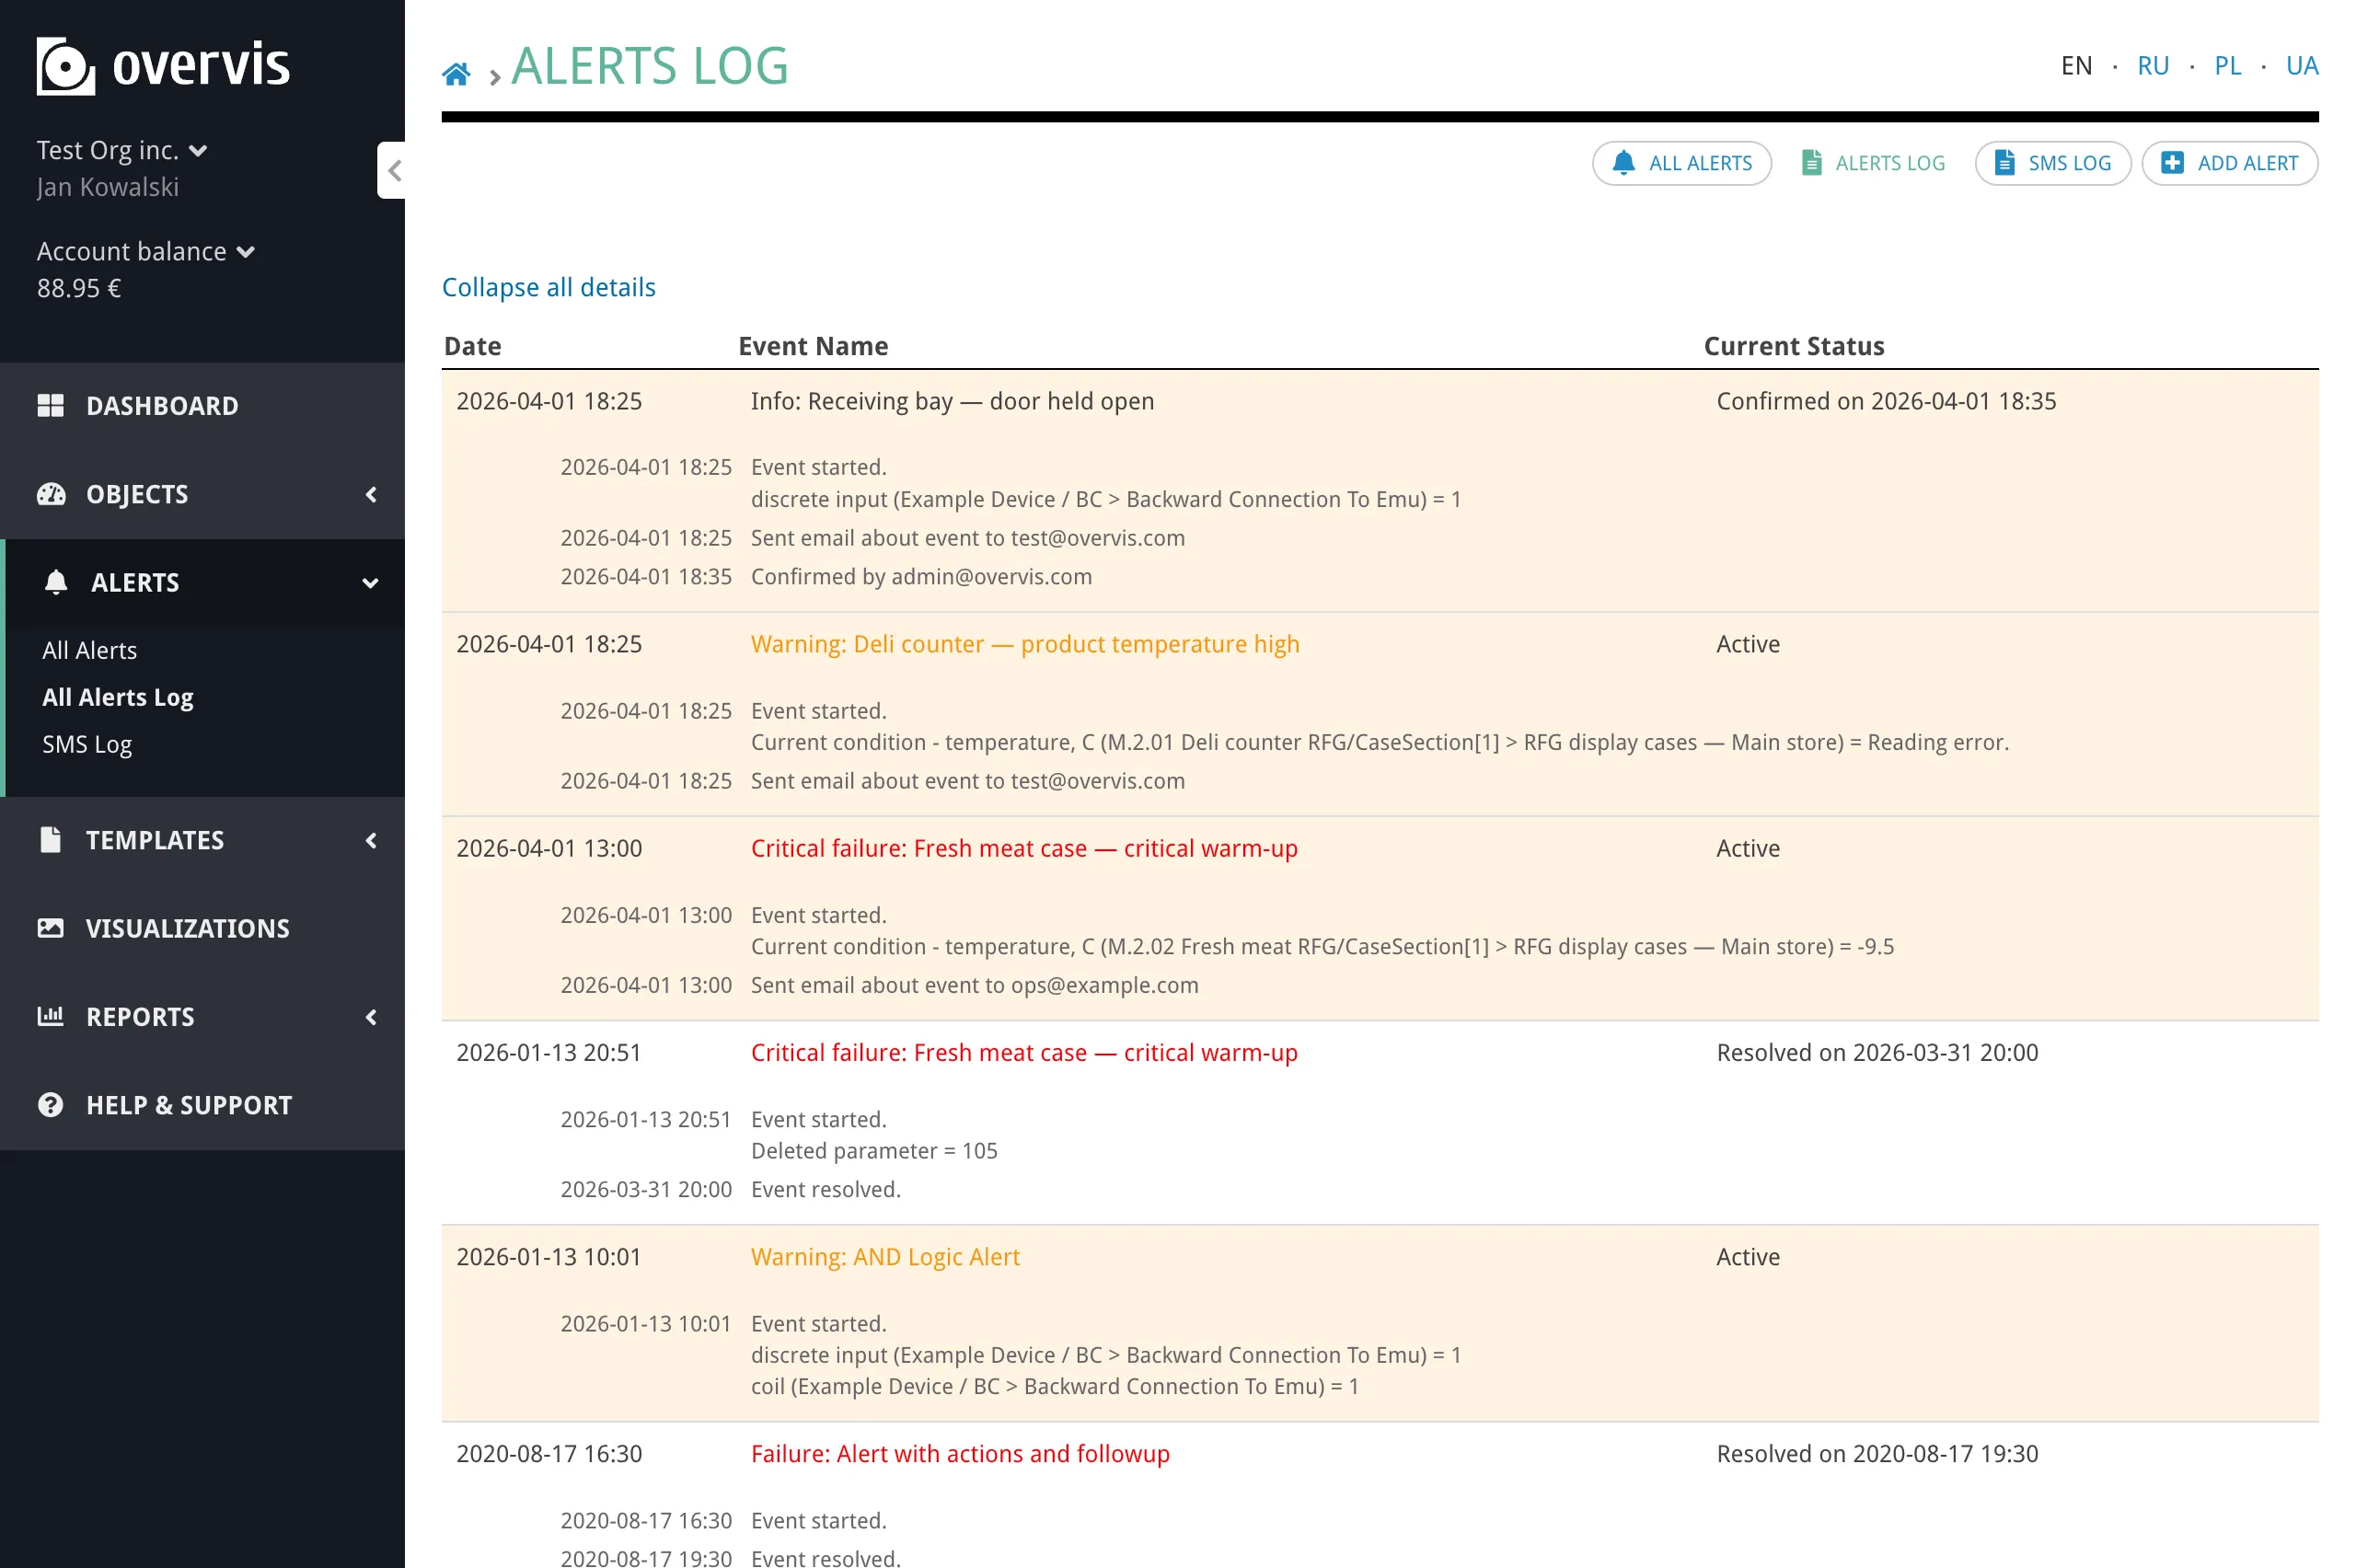
You can expand each entry to see timestamped details — a chronological list of what happened during the incident (conditions triggered, notifications sent, confirmation received, resolution).
Technical managers can clear the log for an alert — removing finished (resolved) records that are older than a chosen period: 1 day, 1 week, 1 month, 1 year, or all finished records.
Managing alerts
Section titled “Managing alerts”- Settings — open the alert settings to modify conditions, actions, follow-ups, or log level.
- Duplicate — create a copy of an alert with the same configuration. Useful when you need a similar alert for a different set of parameters.
- Delete — permanently remove the alert and all its log records.
Duplicating, deleting, and clearing the log require the technical manager role.
Alert templates
Section titled “Alert templates”If you manage many similar devices, you can include alert definitions in a device template. When the template is applied to a device, Overvis creates the alerts automatically — saving you from configuring the same thresholds and actions for each device individually.
Alert templates are written in YAML and attached to the device template either through the web interface or in the template Excel file. See the Alerts Templates Reference for the YAML syntax and examples.
SMS log
Section titled “SMS log”The SMS log (accessible from the Alerts section in the sidebar as “SMS Log”) shows a record of all SMS and voice call messages sent by the alert system. Each entry includes:
- The date and time the message was sent.
- The associated alert name.
- The message text.
- Sender and receiver phone numbers.
- Whether it was an SMS or a voice call.
- Delivery cost.
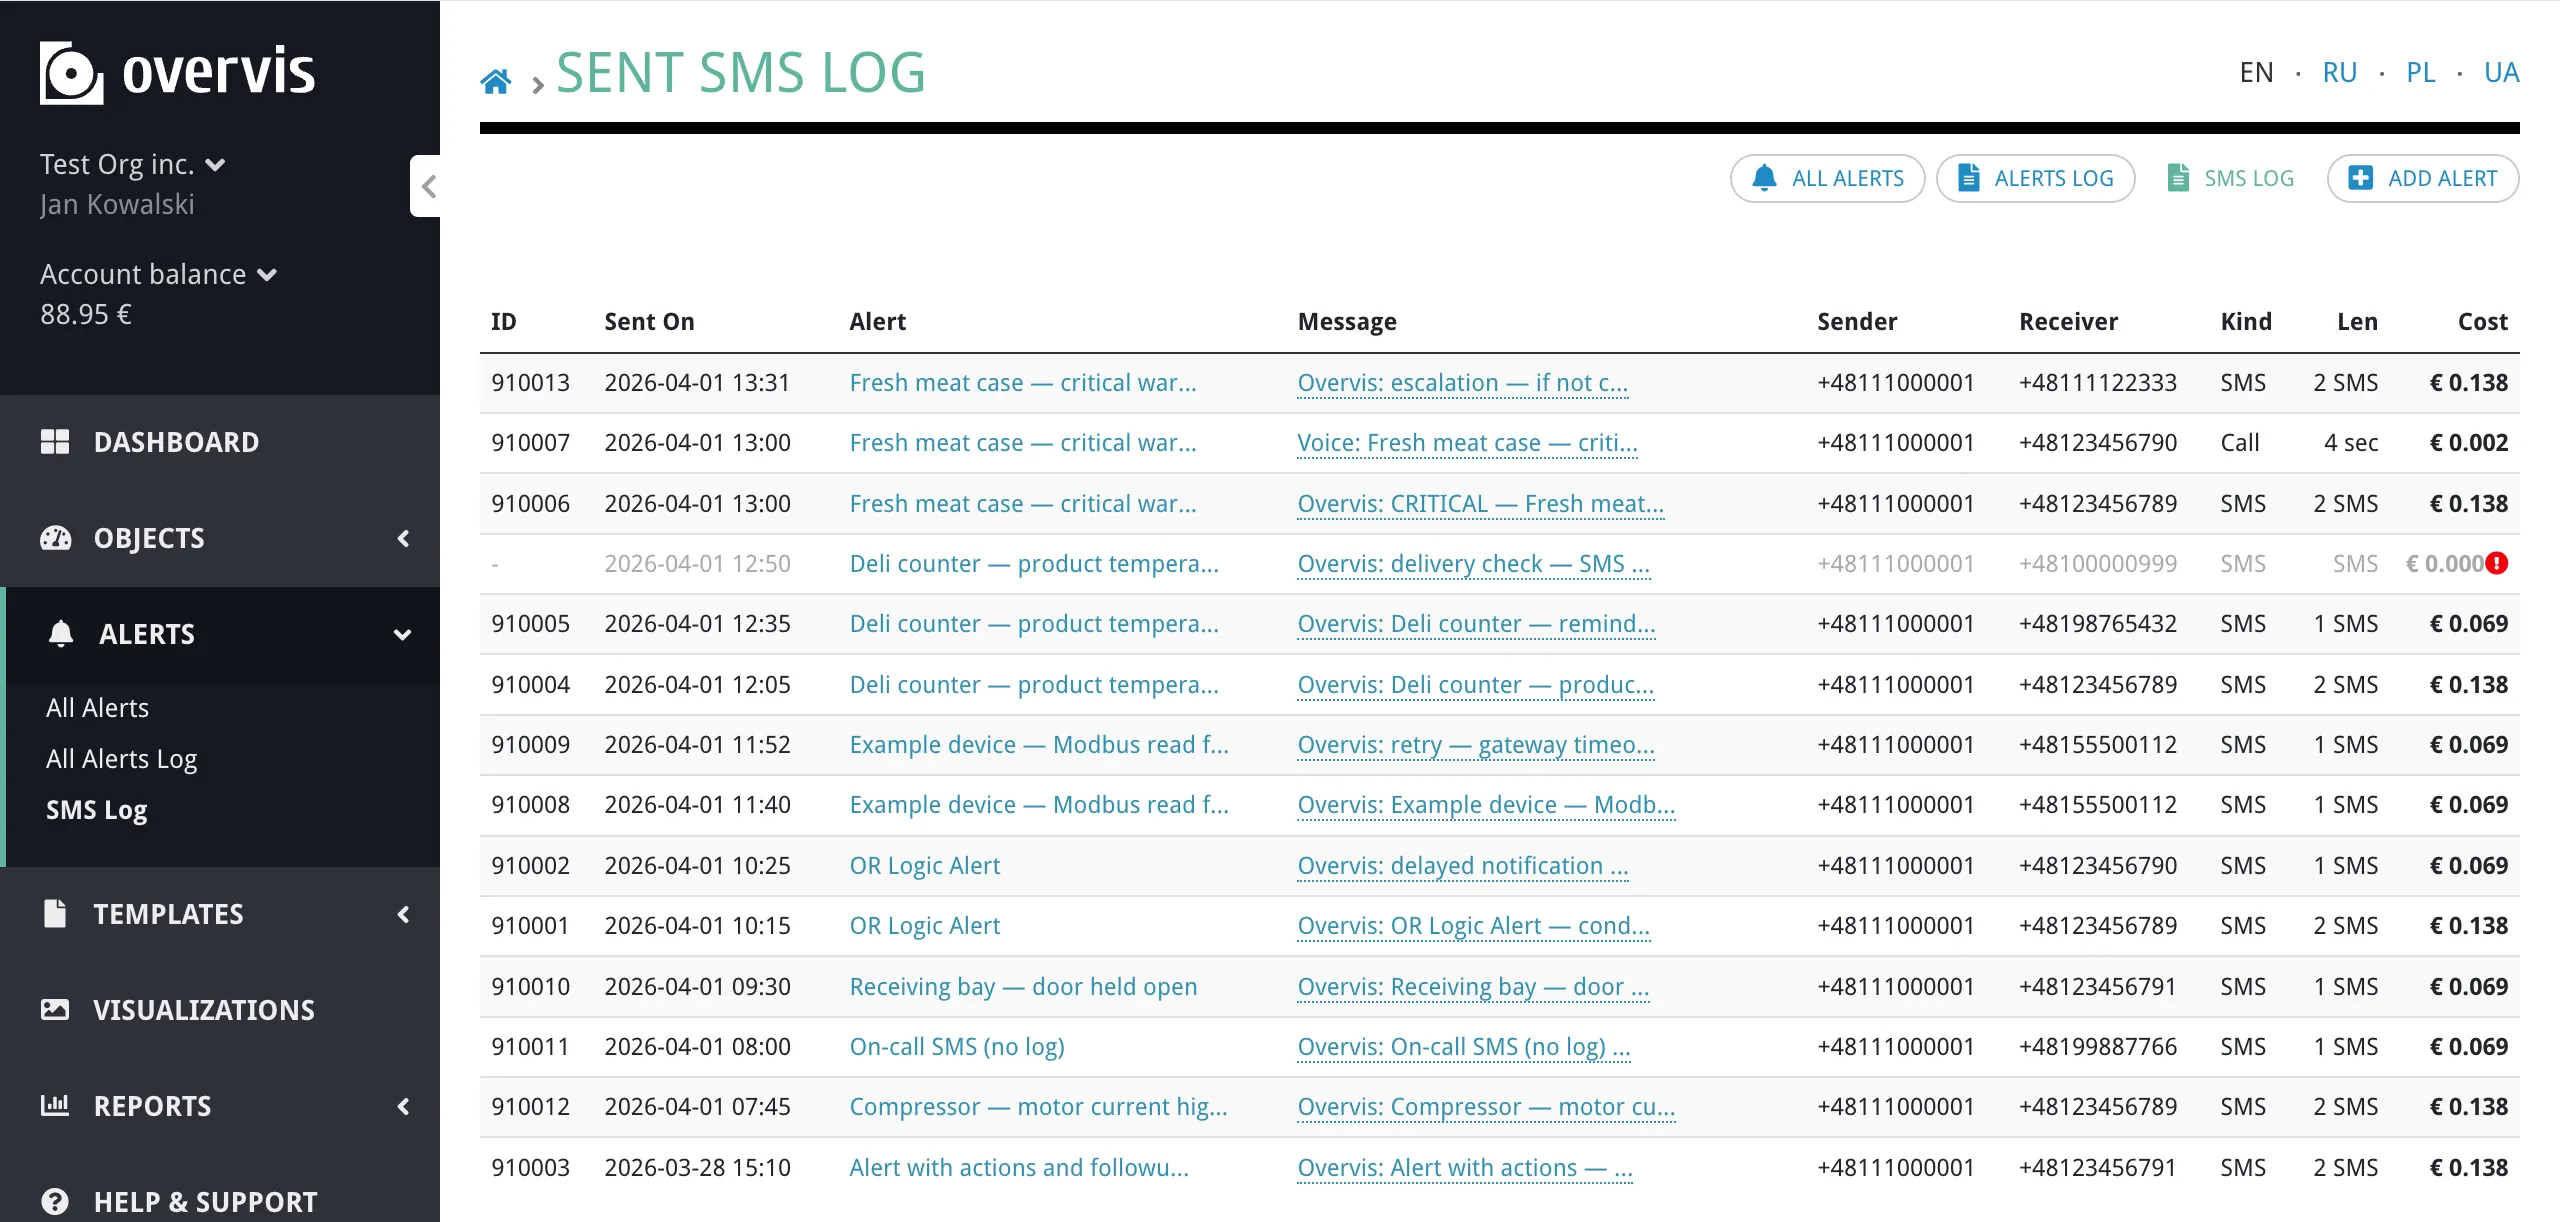
This is useful for verifying that notifications were delivered and for tracking SMS and voice call usage and costs.
Troubleshooting
Section titled “Troubleshooting”Alert is not triggering
Section titled “Alert is not triggering”The parameter is not tracked. Only tracked parameters are polled for readings. If the parameter is not tracked, Overvis has no values to compare. Go to the device page and make sure the parameter has the “Tracked” flag enabled. See Behavior Flags.
The device or network is disabled. Disabled devices and networks do not process alerts. Check that both the network and the device are enabled.
The parameter has no recent readings. If the parameter has never been read (e.g. the device has not been polled yet), conditions cannot evaluate. Check the “Last reading” column on the alerts overview page — if it shows ”-”, the parameter has not been read yet.
Threshold is in wrong units. The threshold is compared against the displayed value (after multiplier). If you enter a raw register value instead of the engineering value, the condition may never match. Make sure the threshold uses the same units shown on the device page.
Condition logic mismatch. If you have multiple conditions with “Every condition should be satisfied” (AND), all of them must be true simultaneously. Check whether one condition is preventing the alert from activating.
Not receiving notifications
Section titled “Not receiving notifications”No default recipient configured. If you left the recipient field empty, Overvis uses the organization’s default notification email or phone. If neither is configured, the notification is silently skipped. Set default recipients in organization settings, or enter an explicit recipient in the alert action.
Email going to spam. Check your spam or junk folder. Add the Overvis notification sender address to your email whitelist.
SMS is disabled for the organization. If SMS sending has been disabled (e.g. due to billing), SMS and voice call notifications will not be delivered. Check if a notice about disabled SMS appears at the top of the Alerts page.
Delay has not expired yet. If you configured a delay (e.g. “If not resolved in 30 min”), the notification will not be sent until the delay period passes. If the alert resolves before that, the notification is cancelled.
Too many false alarms
Section titled “Too many false alarms”Use action delays. Set a delay like “If not resolved in 5 min” or longer. Brief fluctuations that resolve quickly will not trigger notifications.
Adjust thresholds. If the threshold is too close to the normal operating range, small variations will trigger the alert. Add a margin to account for normal fluctuation.
Use AND logic for multiple conditions. Requiring all conditions to be satisfied simultaneously reduces false positives from isolated spikes.
”Resolved” notifications not being sent
Section titled “”Resolved” notifications not being sent”“When resolved” follow-ups are only sent if at least one activation notification was already sent or scheduled. If the alert activated and resolved too quickly (before any “Do…” action fired), no resolution notification is sent. This is intentional — it avoids orphan “resolved” messages for events that were too brief to notify about.
Alert confirmation not working
Section titled “Alert confirmation not working”Email confirmation link. Make sure you are clicking the confirmation link from the original notification email. Links are specific to each alert event — a link from a previous event will not work for a new one.
SMS confirmation code. Reply with the 5-digit code to the same phone number that sent the SMS. The code is valid only while the alert is active and has not been confirmed yet.
Alert already resolved. If the alert resolved before you confirmed, the confirmation page will indicate that the event has already been resolved. Confirmation is no longer needed in this case.
Common questions
Section titled “Common questions”Can different people receive different alerts?
Section titled “Can different people receive different alerts?”Yes. Each action and follow-up has its own recipient field. You can configure one alert to email an operator and another to SMS a manager. Within a single alert, you can add multiple actions to notify different people through different channels.
What happens if the device goes offline?
Section titled “What happens if the device goes offline?”If a device cannot be reached, parameters will have reading errors. You can use the “Has reading error” condition to be notified when a device stops responding. After the system starts, reading error conditions are silenced for approximately 2 minutes to avoid false alarms during startup.
Can I temporarily disable an alert without deleting it?
Section titled “Can I temporarily disable an alert without deleting it?”There is no “pause” button in the alert settings. To temporarily stop an alert from firing, you can either remove the conditions or actions and restore them later, or set all actions to “Nothing” (no notification). Alternatively, duplicating the alert before editing preserves the original configuration for easy restoration.
How quickly does Overvis detect a condition?
Section titled “How quickly does Overvis detect a condition?”Overvis evaluates alert conditions immediately after each parameter reading. The detection speed depends on the polling interval configured for the network — typically a few seconds to a minute. There is no additional delay between a parameter reading and the condition evaluation.
What is the difference between actions and follow-ups?
Section titled “What is the difference between actions and follow-ups?”Actions (“Do…”) fire when the alert first activates. They are the initial notifications. You can add a delay to them (e.g. “If not resolved in 10 min”) to filter out brief events.
Follow-ups (“Follow up…”) fire at later stages: when the alert resolves, when someone confirms it, or when nobody has confirmed it within a timeout. They are used for escalation and resolution tracking.
Does clearing the log affect active alerts?
Section titled “Does clearing the log affect active alerts?”No. Clearing the log only removes resolved (finished) alert records that are older than the selected period. Active alert records and the alert configuration itself are not affected.
Can I see what notifications were sent?
Section titled “Can I see what notifications were sent?”Yes. Expand an alert log entry to see a detailed timeline of all notifications sent during the incident, including timestamps and recipients. For SMS and voice call delivery details, check the SMS Log page.
Related documentation
Section titled “Related documentation”- Networks, Devices, and Parameters — how parameters are configured and tracked.
- Alerts Templates Reference — YAML syntax for including alerts in device templates.
- Device Templates — overview of the template system.
- Parameter Values Report — analyze historical parameter data.