

Quick Start Guide
Цей контент ще не доступний вашою мовою.
This guide walks you through setting up your Overvis MC261 gateway from wiring to successful connection in about 15 minutes.
The Overvis MC261 is a programmable gateway that bridges LoraSens and RS-485 Modbus devices to modern networks, letting you monitor and control industrial equipment remotely via Ethernet or Wi-Fi connections.
What You’ll Need
Section titled “What You’ll Need”From the delivery box: MC261 device, Ethernet cable, LoRa antenna, 2GB microSD card.
You’ll also need:
- 12V DC power supply (9-30V range supported)
- Device with web browser for initial setup (computer, phone, or tablet)
- RS-485 Modbus devices or LoraSens devices to connect
- Twisted-pair cable for RS-485 (Category 1+, shielded recommended)
- Stranded wire (≥1 mm² cross-section), ferrules, and tools (screwdriver, wire stripper)
Step 1: Physical Setup
Section titled “Step 1: Physical Setup”Mount your MC261 on a standard 35mm DIN rail in a well-ventilated location. The device operates from -35°C to +55°C, but avoid areas with excessive vibration, humidity, contaminated or corrosive atmospheres.
Install memory card: Insert the provided 2GB microSD card into the SD slot. The memory card is required for firmware updates, data logging, and automation logic programming features.
Attach antennas: If you plan to use LoraSens devices, attach LoRa antenna to the ANT1 connector. To use Wi-Fi, attach the Wi-Fi antenna to the ANT2 connector.
Network connection: Connect the Ethernet cable from MC261’s LAN port to your router or directly to your computer. Wi-Fi can be configured after initial access.
Before making any electrical connections, ensure all devices are powered off.
Tighten terminal screws to 0.4 N·m — enough for solid contact without damage.
RS-485 wiring: Connect twisted-pair cable to MC261’s RS-485 terminals: terminal A for non-inverted signal, terminal B for inverted signal (your devices might label these as A/D+/+ and B/D-/- respectively). Run the cable to your Modbus devices and connect accordingly. Use shielded twisted-pair cable (Category 1 or better) for reliable communication over distance.
Power: Connect 12V DC power to the 9÷30V terminals. For safety, install a 2.5A fuse in the power circuit. Use stranded wire with ferrules, stripped 5mm. Wire cross-section should be 0.5-3 mm².
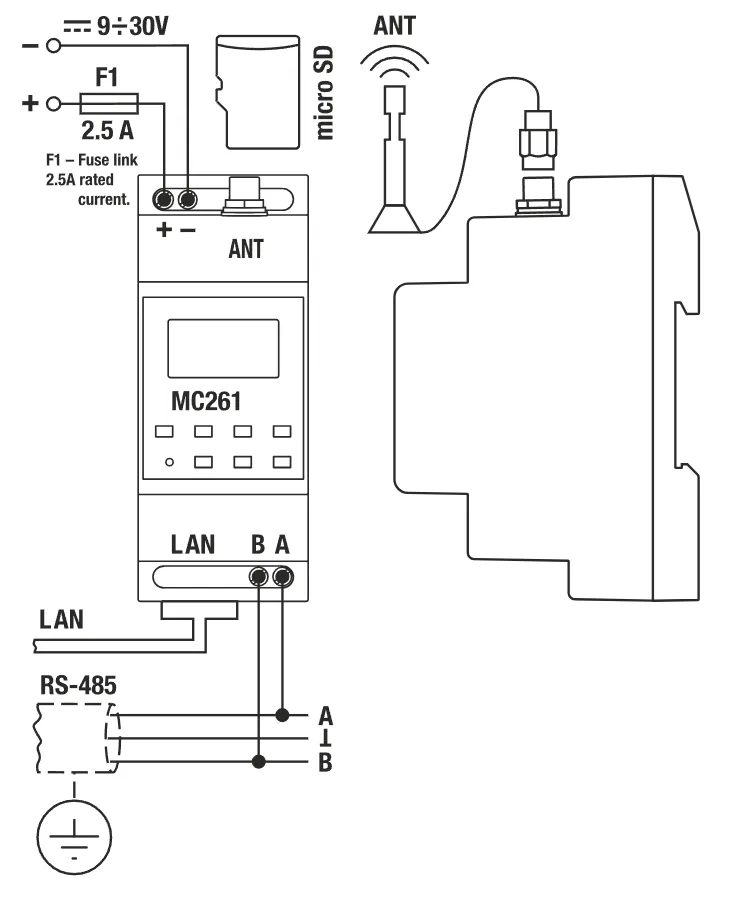
Step 2: Power On
Section titled “Step 2: Power On”When you apply power, all LEDs light up briefly during the 2-second initialization, then the device spends 4-5 seconds establishing network connections.
The PWR LED stays on to confirm power. The LAN LED turns on when Ethernet connects (blinking during data transfers). The Wi-Fi LED blinks slowly (every 3s) when searching for access point, or is on continuously after TCP/IP link start.
The display shows IP addresses (prefixed with (E) for Ethernet or (W) for Wi-Fi), plus data rates and signal strength.
Step 3: Access Web Interface and Configure
Section titled “Step 3: Access Web Interface and Configure”Access Web Interface
Section titled “Access Web Interface”There are 2 ways of accessing the web interface:
- Using Wi-Fi Access Point mode (MC261 creates its own Wi-Fi network)
This is the easiest way to access the device for initial configuration.
Press and hold R button on MC261 for 6 seconds, then release it (when the display prompts that releasing it would temporarily switch the AP mode on).
The device creates a Wi-Fi network named MC261_XXXXXX (where XXXXXX are the last digits of the MAC address).
Connect your computer or phone to this network and use the password on the device label.
Open a web browser and enter http://192.168.4.1.
- Using Ethernet connection (MC261 connects to your LAN or directly to a PC)
Note the IP address from the display (press R to wake it).
If connected via Ethernet with DHCP, you’ll see the assigned address.
Connecting directly to a PC?
Without a DHCP server, the device uses the preset IP (default is 192.168.0.111). Configure your computer’s network adapter with IP 192.168.0.10 (or any address from 192.168.0.1-254 except 111), subnet mask 255.255.255.0, leave gateway blank. See the Connections Guide for OS-specific instructions.
Open a web browser and enter the IP address shown on the display (e.g., http://192.168.0.111).
Login to dashboard: You’ll see a login page. Press the R button on MC261 for temporary password-free access.
Configure Settings
Section titled “Configure Settings”Configure network (LAN/Internet tab): Enable/disable DHCP, set static IP if needed, adjust subnet mask and gateway. For Wi-Fi, enter your network’s SSID and password, enable or disable DHCP.
Configure Modbus RTU/ASCII (Modbus tab): Consult the manual of your Modbus devices for their exact baud rate, parity and stopbits settings, then match these exactly in MC261. If no manual is available, start with common values: 9600 or 19200 baud, Modbus RTU protocol, and AUTO-STOP parity (which automatically detects the correct stopbits setting).
MC261 has Modbus TCP server enabled by default on port 502. You can change the port or set Modbus passwords (on the Administration page) if needed.
For detailed information about all web interface options, see the Web Interface Guide.
Step 4: Test Modbus TCP Connection
Section titled “Step 4: Test Modbus TCP Connection”Use a Modbus client application to test the gateway. Connect to MC261’s IP address (from the display) on port 502.
-
Test MC261 itself first: Read a holding register from MC261’s own Modbus address (unit ID
111by default). Try reading register 1 (firmware version) or register 175 (supply voltage). If this works, MC261’s Modbus TCP server is correctly available. -
Test connected devices: Send a read request to one of your RS-485 devices using its actual Modbus address (check your device’s manual for its address, commonly 1). Try reading a known register from that device.
-
Modbus passwords: By default, Modbus read access is unrestricted (empty password). If you’ve set a password in the web interface, you’ll need to send the password first. See the Modbus Interface guide for password authentication details.
Common issues:
- No response from MC261 itself → Check IP address, port 502, firewall settings
- MC261 responds but RS-485 devices don’t → Verify baud rate, parity, A/B wiring, device addresses, Modbus protocol selection and power supply
- Wrong data returned → Check register address matches your device’s documentation. Check if the value is 10, 100 or 1000 times bigger than expected (this is normal for Modbus integer scaling)
Step 5: Add LoraSens sensors (Optional)
Section titled “Step 5: Add LoraSens sensors (Optional)”You’ll need a sensor device to bind to the MC261. Start a binding procedure on the sensor (see the sensor manual).
Open LoraSens tab on MC261 web interface (interface is enabled by default).
You should see the new sensor there, with Bind and Ignore options.
Review the offered device identifier and type, then press Bind.
Assign a descriptive title and adjust the sleep interval, then wait for its first scheduled report.
The recently online sensors are shown in green, while offline sensors are shown in gray.
The last report time is displayed for each sensor.
MC261 supports at most 40 wireless sensors.
For programmatic binding, status, settings, and journal access, see the LoraSens API.
Step 6: Connect to Overvis Cloud (Optional)
Section titled “Step 6: Connect to Overvis Cloud (Optional)”Overvis Cloud provides remote monitoring and control through a web dashboard. The device label includes a QR code and PIN for quick setup.
-
Enable Cloud connection: Open MC261’s web interface and go to the Cloud tab. Select the
Modbus TCPmode for cloud connection and clickSave & Reset.Wait for the device to restart and establish connection. -
Access Overvis server: Scan the QR code on the device label or manually enter the link from the label (format:
https://c.overvis.com/ABCD1234where the last part is your PIN). The link redirects to Overvis server’s login page. Optionally follow the Overvis link on the Cloud tab. -
Login or create account: Enter your credentials if you have an account. New users should create an account first.
-
Create Network: After login, Overvis shows the “Create Network” page. If you came from the QR code/link, the PIN is pre-filled. Otherwise, enter the PIN from the device label and click “Check connection.”
-
Verify connection status: Overvis displays the connection status — either “Connected” or “Device is not connected to the server.” If not connected, check that MC261 has Internet access (Ethernet or Wi-Fi) and verify the Cloud tab settings in the web interface.
-
Configure your network: Give your network a descriptive name (a “network” represents your MC261 plus all connected Modbus devices). MC261 itself (unit ID
111) is added automatically. -
Add connected devices: Select your RS-485 device models from the dropdown menus and enter their Modbus addresses. Overvis creates device instances from templates matching your selections.
-
Test communication: Open a device page in Overvis and read its parameters to confirm real-time communication is working.
Troubleshooting cloud connection:
- “Device is not connected” → Check Internet connectivity (verify IP addresses on display), review Cloud tab in web interface for connection settings, status and errors
- PIN not accepted → Verify you entered the exact PIN from this device label
- Can’t create account → Ensure email address entered is valid, check email for verification link
Troubleshooting
Section titled “Troubleshooting”Display shows (E) 0.0.0.0: Normal during first 20-60 seconds while DHCP negotiates. If it persists, check cable connection and router DHCP. Try direct PC connection with static addressing settings.
Display shows (E) 192.168.0.111: but web interface does not show up DHCP failed or is unavailable. MC261 has switched to its factory default static IP address. Either configure your client device to the same subnet (192.168.0.x) or enable DHCP on your router.
Can’t access web interface: Verify IP address entered in browser matches what’s on the display. Ensure Ethernet address is used (the one marked with (E) in the second line). Check PC and MC261 are on the same subnet. Temporarily disable firewall. Press R for password-free access. Clear browser cache.
Wi-Fi won’t connect: Check the antenna is attached, check the Wi-Fi settings. Check that access point is active. Check signal strength on display (should be >0%). Try relocating antenna to better position.
RS-485 devices don’t respond: Most common issue is mismatched settings. Verify baud rate matches all the devices. Check A/B wiring polarity (swapping these is very common - this doesn’t cause equipment damage, but prevents communication). Try increasing delays in MC261 settings for RS-485. Ensure protocol (Modbus RTU/ASCII) and parity are the same for all the devices. Start with 9600 baud, RTU, AUTO-STOP parity.
Service Button Quick Reference
Section titled “Service Button Quick Reference”The R button functions depend on press duration:
Quick press: Wake display, show status, grant temporary web access
Hold 2-6 seconds: Prepare for safe memory card removal and restart device
Hold 6-11 seconds: Toggle Wi-Fi access point mode on and off, restart device
Hold 11+ seconds: Factory reset (erases all settings)
What’s Next?
Section titled “What’s Next?”- MC261 Operating Manual — Complete technical documentation
- Web Interface Guide — Configuration options explained
- Connections Guide — Network setup, VPN, and security
- Modbus Interface — Protocol details and register reference
Need Help?
Section titled “Need Help?”For technical support and assistance:
- Email: support@overvis.com
- Support portal: www.overvis.com/support