

Connect an OB-215 through an MC252
Цей контент ще не доступний вашою мовою.
This tutorial connects real equipment the way most sites do: an Overvis MC252 controller joins the Overvis VPN, and devices on its RS-485 bus reach your workspace through it. The worked device is a Novatek-Electro OB-215 I/O module with a temperature sensor. Other Modbus RTU devices on the bus connect the same way.
You need the Editor, Admin, or Owner role in a workspace, for example the
Cold room tutorial workspace from the earlier tutorials. Allow about 45 minutes.
Prepare the hardware
Section titled “Prepare the hardware”You need:
- An Overvis MC252 with its microSD card inserted, a 9–30 V DC supply, and an Internet connection over Ethernet or cellular
- The 8-character PIN printed on the MC252 label
- An OB-215 with an isolated 12–24 V DC supply and a temperature sensor
- A twisted pair cable for the RS-485 bus
De-energize equipment before wiring. Terminal maps, ratings, and safety limits are in the MC252 manual and the OB-215 operating manual.
Connect the MC252 to Overvis
Section titled “Connect the MC252 to Overvis”- Wire the MC252 supply and connect it to the Internet.
- Open the MC252 web interface. On the Cloud tab, set Cloud Mode to WireGuard and save. The MC252 restarts.
- Wait until the SRV light on the MC252 is on. The MC252 is now online on the Overvis VPN.
The MC252 manual describes the web interface and the lights.
Pair the MC252 with your workspace
Section titled “Pair the MC252 with your workspace”- In the workspace, open Setup, then Endpoints.
- Select Create endpoint. The dialog starts on PIN.
- Enter a name such as
Cold room MC252and the PIN from the MC252 label, and select Create. - The dialog asks you to confirm that this is your device. Within two minutes, press the R button on the MC252, and the dialog continues on its own. If the MC252 screen shows an 8-digit code instead, enter that code and select Confirm code.
- Open the endpoint’s status page and wait for Connected.
If the dialog says that the firmware is too old, update the MC252 in its web interface (Administration) and start again. Other problems are covered in Create a PIN endpoint.
Wire the OB-215 to the RS-485 bus
Section titled “Wire the OB-215 to the RS-485 bus”- Connect the OB-215
+Aterminal to MC252 terminal 2 (A), and-Bto terminal 1 (B). Connect the ground according to your site’s practice. - Wire the temperature sensor and the OB-215 supply as the OB-215 manual shows.
- Power the OB-215.
The OB-215 leaves the factory with Modbus unit ID 1 and serial settings that the MC252 tries
first, so you do not need to configure either. If you changed them, keep the new values at hand.
Let the assistant find the OB-215
Section titled “Let the assistant find the OB-215”- Select AI in the header to open the assistant.
- Ask:
Find the devices on the RS-485 bus of the Cold room MC252. - Wait while the progress card shows the unit IDs the MC252 tries and finds. A second card shows the assistant identifying the model at each unit ID.
- The assistant reports an OB-215 at unit ID
1and offers its parameter template. Select Allow to add the parameters.
If nothing is found, check the A and B wires, the OB-215 power, and the microSD card in the MC252. If you changed the OB-215 serial settings, tell the assistant the baud rate. Find devices on an MC252 RS-485 bus has the details.
Verify communication
Section titled “Verify communication”- Open Setup, then Parameters. The OB-215 has its own branch.
- Turn on Live and expand Device.
- Check that Device identifier shows
27, the OB-215’s model code, and that Supply voltage is close to the voltage of the OB-215 supply.
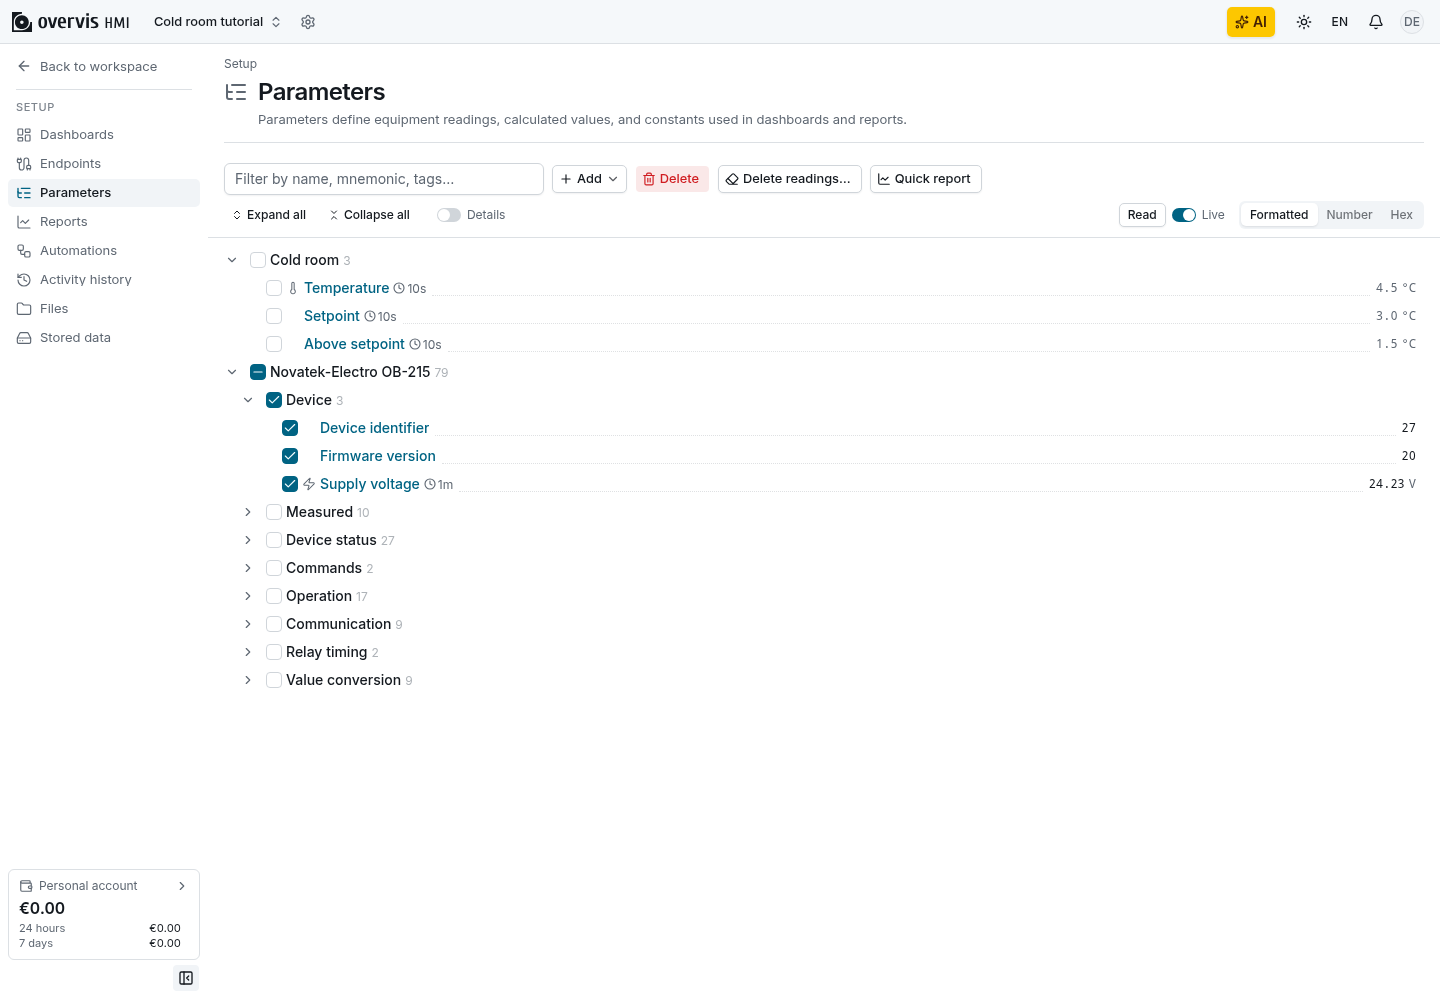
The temperature reading depends on the OB-215 operation mode, which must match the sensor type. If Device identifier reads but the temperature does not, set the mode in the next step.
Add the OB-215 dashboard
Section titled “Add the OB-215 dashboard”- Ask the assistant:
Add a dashboard for this OB-215. - Select Allow when it asks to create the dashboard.
- Open the new dashboard. The Overview tab shows the reading of the active operation mode and the relay. The Settings tab shows the device settings, including the operation mode for your sensor.
On physical equipment, switch the relay only when switching the connected load is safe: a relay write can start equipment.
You have connected a device through an MC252. To add more devices, wire them to the same bus with their own unit IDs and ask the assistant to find them again. For connection problems, see Troubleshooting.