Appendix B: Connections
Ta treść nie jest jeszcze dostępna w Twoim języku.
1. IP Addressing
Section titled “1. IP Addressing”When devices are communicating over Ethernet network using TCP/IP protocol, every device is using a set of IP-addressing settings to identify the sender and receiver of the data. The device memory contains a personal and unique, within a single subnet, IP-address (four bytes are written as four integers, separated by dots, in the range of 0-255), subnet mask, which is the same for all devices within the subnet (written similar to IP-address), and IP-address of the gateway, which is used to communicate with other networks.
Proper communication between devices of a subnet is possible under several conditions:
-
All devices of a subnet have similar mask. Most of small LANs are using 255.255.255.0 mask.
-
Mask starts with a group of bits set to 1, followed by a group of bits turned to 0.
-
All bits set to 1 in the mask are similar for all the IP-addresses of devices in subnet and indicate the subnet address. 192.168 is most frequently used address in LANs for the mask 255.255.255.0. The third byte may be used as a subnet number in a complex LAN. In smaller LANs, the third byte is usually equal to 0.
-
A set of bits in IP-address of the device, which is set to 0 in the mask, is unique to each device within the same subnet.
In most cases, the device like router, which is already communicating with other networks, is switched to the network. This device often gets the following address 192.168.0.1, 192.168.0.100, or 192.168.0.101. In this case, other devices in the network shall have this IP-address of the device as the gateway address. This address is not necessary for communication between devices in a subnet, and is only used to connect devices of one subnet to devices of other networks.
Factory Addressing Settings
Section titled “Factory Addressing Settings”| Parameter | Value |
|---|---|
| Addressing using DHCP | Yes |
| IP-address | 192.168.0.111 |
| Subnet mask | 255.255.255.0 |
| Gateway | 192.168.0.1 |
With EM-486 factory settings, for communication with it via Ethernet there are 2 possible ways:
a) The network uses a router or other DHCP server, which assigns IP addresses to new devices. In this case, it is sufficient to connect the EM-486 to the network, and after some time the obtained IP address appears on the display. The address “0.0.0.0” means that the desired value has not been received yet. The address “192.168.0.111”, obtained after 30-60 seconds after running EM-486, may mean that getting address from the DHCP server failed and the device uses a static address.
b) The network is not able to use DHCP, or EM-486 is connected directly to the computer (or another device-client on the same subnet). In this case, EM-486 will switch to static addressing after some time (30-60 seconds) after starting. A client device should use a mask 255.255.255.0 as a mask and address starting with 192.168.0. The fourth byte of the address can take any value in the range from 1 to 255, except for 111.
If the connection between EM-486 and a client device is not provided directly but via a network with a number of devices, the mentioned address cannot be equal to any of the addresses of other devices on the subnet. If network has several devices with the mask and the first three bytes of the IP-address, which are different from those specified in the factory settings, or the EM-486 factory IP-address is already taken, the configurable device should be temporarily removed from the network to avoid addressing conflicts and establish a communication between this device and EM-486 directly. This will allow configuring the device and EM-486 for direct communication or switching EM-486 to the network.
2. Configuring the Client Device
Section titled “2. Configuring the Client Device”The device addressing is set according to documents and software it uses.
Below is an example of configuring the personal computer (PC) on Windows 7/8/10/11 to communicate directly with the EM-486 on factory settings.
Opening Network Connections in Windows
Section titled “Opening Network Connections in Windows”For Windows 11:
- Log in to the OS under an administrator account
- Select “Start → Settings”
- Select the “Network and Internet” category
- Expand the “Advanced Network Settings” group
- Select “Advanced network adapter settings”
For Windows 7/8/10:
- Log in as administrator
- Select Start → Control Panel
- If control panel items are divided into categories, select “Network and Internet”
- Go to “Network and Sharing Center”
- In the task bar (on the left), select “Change adapter settings”
Configuring the Network Connection
Section titled “Configuring the Network Connection”-
In the Connections window, select the desired connection via an adapter with the addressing that you want to change. Many computers have only one adapter and one connection, which will be displayed in this window. If the window shows several connections, select the connection you want, using the adapter name in the information on connection or contact your system administrator.
-
Click the icon of the connection with the right button, and select “Ethernet Properties” in the drop-down menu. The Properties window opens.
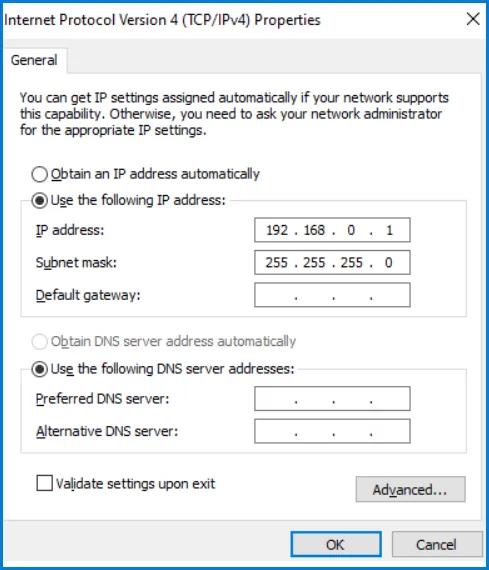
Figure B.1 – Connection properties window in Windows OS
- Select “Internet Protocol Version 4 (TCP/IPv4)” from the list of connection components in the next window. Make sure that the component is enabled (flagged in the list). Click “Properties”. The TCP/IPv4 properties window opens.

Figure B.2 – TCP/IPv4 properties window in Windows OS
-
Select “Use the following IP-address”.
-
Specify the address in the “IP-address” field within the range from 192.168.0.1 to 192.168.0.255 (except for 192.168.0.111, which is used by EM-486).
-
Specify “255.255.255.0” in the “Subnet Mask” field.
-
The fields “Default Gateway”, “Preferred DNS server”, and “Alternative DNS server” should be left blank.
-
Press “OK” to close the Protocol Settings window.
-
Press “OK” to close the Connections Settings window.
-
If prompted by the OS to restart the PC after closing the windows, answer yes.
3. Connection to Internet via Ethernet
Section titled “3. Connection to Internet via Ethernet”Use the following guidelines to connect the device to Internet:
-
Acquire a dedicated line with a static IP-address from your Internet Service Provider (hereinafter referred to as ISP). If static IP is unavailable, a part of functions (direct connection via MODBUS TCP or via the WEB interface) can be unavailable from Internet, at the same time connection to the server in active mode can be used.
-
Direct connection of the device to the ISP cable is not recommended. In case of a router connection, the ISP cable is connected to the “Uplink” socket on the router (It is usually marked with color and has no numbers. The marking depends on the router manufacturer, see the router documentation). The straight-through (supplied) Ethernet cable is used for connecting device to the router.
-
Set the router for Internet connection as per ISP recommendations. The router settings should also provide for the redirection of requests, which are coming to static IP-address provided by the ISP, to the device IP-address (factory setting - 192.168.0.111). If for a dedicated line the static IP address is fixed in Internet, and direct access from Internet to the device HTTP, MODBUS TCP servers is required, then in settings it is required to specify ports of redirection – for a local IP address of a device on which there is a redirection, it is necessary to specify 80 (for access to the WEB-interface), 502 (for access on MODBUS TCP). It will also be necessary to disable DHCP in the settings of EM-486, or configure the router for the provision of EM-486 via DHCP of always the same IP-address.
-
Verify if the Internet connection is protected by standard means (see section 5 below).
-
When referring the device via Internet, use IP-address provided by your ISP.
4. GSM Connection
Section titled “4. GSM Connection”Make sure that your tariff plan includes providing GPRS service (for connection to Internet) and/or receiving and sending SMS messages (for control via SMS).
To connect the device via GSM, use the following recommendations:
-
From GSM provider (next in the text as a provider) you should get a SIM-card.
-
Insert the SIM-card in the device and connect the appropriate antenna to have a proper radio signal in the place of the device location.
-
After starting the device, make sure that SIM-card has correct identification – after the communication initialization, the indicator GSM keeps on blinking; if the indicator goes out for a time longer than 4 seconds, check the SIM-card, antenna and a level of GSM signal on the display of the device.
-
If GPRS is used for Internet connection, make sure that the provider and connection settings are defined via code of SIM-card. When you enter the Internet the GSM indicator blinks 3 times per second; if the indicator flashes less frequently, check the APN settings.
-
In case of necessity, manually set the APN in accordance with the provider’s recommendations.
5. Protection of Connection
Section titled “5. Protection of Connection”EM-486 has basic protection against unauthorized access over network:
-
Access for writing and/or reading via MODBUS TCP or via SMS can be deactivated in settings.
-
Device settings can be changed remotely by entering the password (minimum 5 characters). Entering several incorrect passwords while trying to determine the correct one is blocked by the device.
-
Access passwords can be set for restriction of writing and/or reading via MODBUS TCP or via SMS.
-
When entering the password, all settings shall be only available to a given client using a given protocol. In case of no requests from the client over the long period, the access returns to locked mode.
-
The device protection system is not designed to counter malicious network attacks (especially those, which are not trying to get access to the device but to block it instead).
-
In case of complex and large networks (especially when providing access to the EM-486 via Internet), the users are recommended to separate the device from unprotected networks with standard protective equipment (router, configured to filter the transmissions, Firewall, etc.).
6. Connection to Server
Section titled “6. Connection to Server”EM-486 has the mode of constant communication with the data collection and management server. Data collected by the device is transferred and accumulated on the server; this data can accumulate in the internal memory of the device when connection is failed and transmitted to the server when connection is restored.
As a server there can be, for example, the system Overvis (Internet-address is overvis.com).
Overvis – is a system for monitoring and remote control of technological processes. Overvis makes it possible to read the data and make control over the devices including EM-486, provided there is a connection with them, and in the future to convert and view them in a convenient form, to receive alarm messages as SMS or E-Mail.
EM-486 factory settings are prepared for connection to Overvis.
Overvis system supports a special manner of identification which is used in EM-486. Thereat the devices are verified by a unique MAC-address which is sent to the server at each connection session.
Device Registration Methods
Section titled “Device Registration Methods”The device registration for a user of the Overvis system is possible in two ways:
a) If the device has a sticker with a QR code – it is required to read the code and follow the link or enter a link from the stickers manually and follow the instructions of the server.
b) Enter the activation code to a user account of Overvis. The code represents the number of 8 characters and is displayed on the display and on the status page of the WEB interface of the device after connecting to the server. When you enter code, EM-486 is “attached” to a user account.
Connecting to Overvis Using Activation Code
Section titled “Connecting to Overvis Using Activation Code”To connect a new device to the Overvis system using activation code you should:
-
Connect the device to Internet via one of the above-mentioned methods.
-
Make sure (by information on the display or on the page of parameters of the device WEB-interface state) that the connection to the server is made and the activation code is received.
Server:(E) 85629051Figure B.3 – Image of the activation code on the display (E - connection to server via Ethernet)
-
If for this device that is reconnected to Overvis, information is displayed that the connection is activated, or connection without a code, then for security reasons, you must click the “Restart activation” button at the bottom of the status page, in the settings via the WEB interface, to remove the device from Overvis. This ensures that the EM-486 will only be used by authorized users.
-
Using the instruction on the site of Overvis system, connect to EM-486 with activation code; after activation during the connection to the server there will be shown on the device display a message «activated».
The message “no code” means that the device has been registered using the QR code on the sticker.
Server(E) activeFigure B.4 – Display image of activation state
For information about EM-486 connection to other servers, contact the Device manufacturer.