Quick Start Guide
Ta treść nie jest jeszcze dostępna w Twoim języku.
This guide walks you through setting up your EM-482 Protocol Converter from wiring to successful connection in about 15 minutes.
EM-482 provides Modbus communication between clients and servers in TCP networks and between devices at RS-485 interface.
What You’ll Need
Section titled “What You’ll Need”From the delivery box: EM-482 device (and Wi-Fi antenna, if it is EM-482-1 model to be installed in poor signal environment).
You’ll also need:
- 12V DC power supply (7-30V range supported)
- Device with Wi-Fi and web browser for initial setup (computer, phone, or tablet)
- RS-485 Modbus devices to connect
- Twisted-pair cable for RS-485 (Category 1+, shielded recommended)
- Stranded wire (≥1 mm² cross-section), ferrules, and tools (screwdriver, wire stripper)
Step 1: Physical Setup
Section titled “Step 1: Physical Setup”Mount your EM-482 on a standard 35mm DIN rail in a well-ventilated location. The device operates from -35°C to +45°C, but avoid areas with excessive vibration, humidity, or corrosive atmospheres.
Before making any electrical connections, ensure all devices are powered off.
Tighten terminal screws to 0.4 N·m — enough for solid contact without damage.
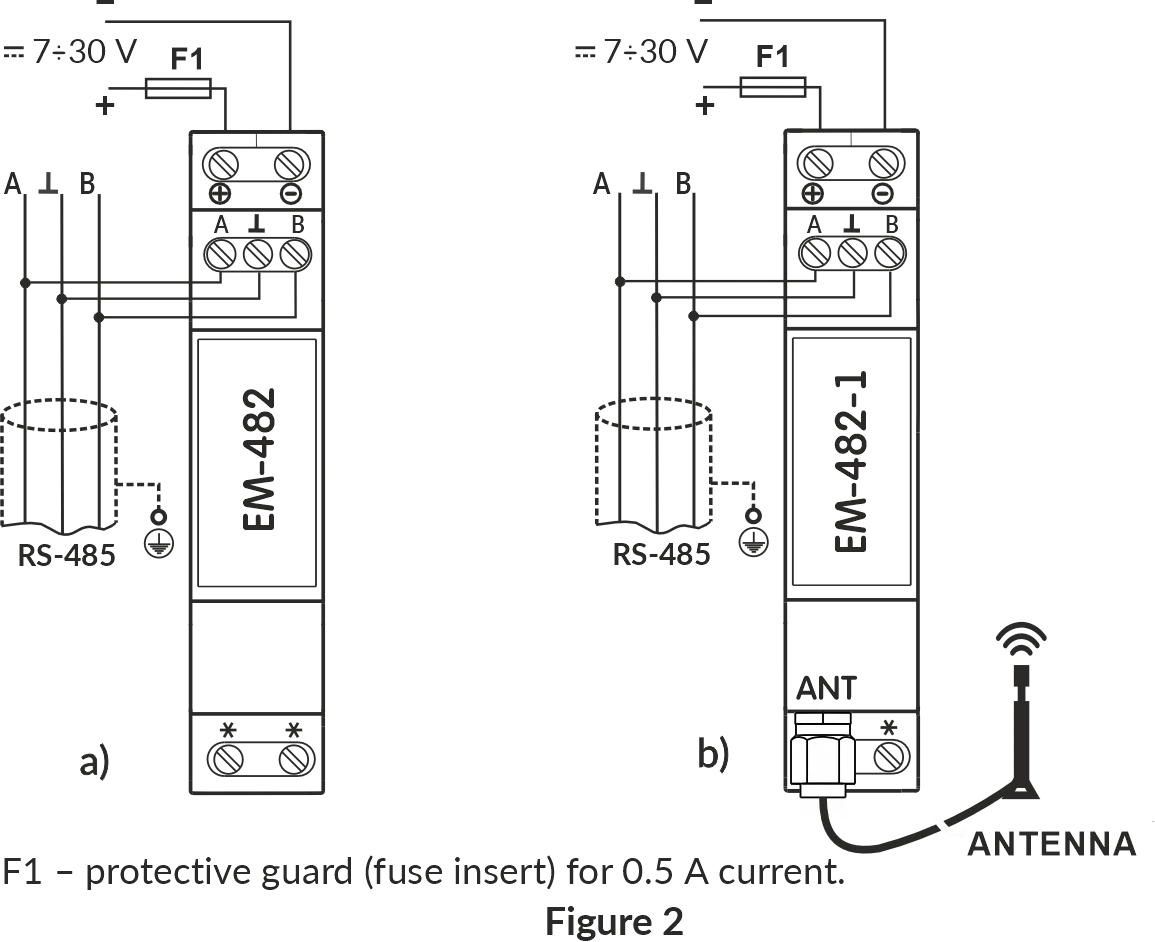
Antenna connection: If it is EM-482-1 model, place the antenna in reach of the Wi-Fi access point (e.g. outside the metal case where the device is mounted). Connect the antenna cable to the ANT connector of the EM-482-1, then tighten it.
RS-485 wiring: Connect twisted-pair cable to EM-482’s RS-485 terminals: terminal A for non-inverted signal, terminal B for inverted signal (your devices might label these as A/D+/+ and B/D-/- respectively). Run the cable to your Modbus devices and connect accordingly. Use shielded twisted-pair cable (Category 1 or better) for reliable communication over distance.
Power: Connect 12V DC power to the 7÷30V terminals. For safety, install a 0.5A fuse in the power circuit. Use stranded wire with ferrules, stripped 5mm. Wire cross-section should be 0.5-3 mm².
Step 2: Power On
Section titled “Step 2: Power On”When you apply power, all LEDs light up briefly during the 2-second initialization, then the device spends 10-30 seconds establishing Wi-Fi connection.
The PWR LED stays green to confirm power. The WI-FI LED blinks rarely (every 3 seconds) when establishing the connection and turns on when Wi-Fi connects (blinking afterwards during data transfers).
The WI-FI and SRV indicators flashing alternately indicate that the Wi-Fi setup mode (access point) is enabled.
Step 3: Switch to Wi-Fi Setup Mode
Section titled “Step 3: Switch to Wi-Fi Setup Mode”- Press and hold the reset button «R» for 2 to 8 seconds; after the «PWR» indicator turns red, release the «R» button.
- If you have entered the Wi-Fi setup mode, make sure that the «WI-FI» and «SRV» indicators are flashing alternately.
Step 4: Access Web Interface and Configure
Section titled “Step 4: Access Web Interface and Configure”-
Connect to EM-482 access point: Open your device Wi-Fi list and select the «EM482_xxxxxx» network (where xxxxxx are the last 6 characters of the Product’s MAC address indicated on the product label).
-
Open EM-482 web interface: Open your browser and enter the
http://em.comorhttp://192.168.4.1address. -
Configure Wi-Fi network: Select the EM-482 future access point, enter its password, enable/disable DHCP, set static IP if needed, adjust subnet mask and gateway.
-
Configure Modbus RTU/ASCII: This can be done at the cloud server later. Consult the manual of your Modbus devices for their parameters (baud rate, parity and stop bits settings), then match these exactly in EM-482. If no manual is available, start with common values: 9600 or 19200 baud, Modbus RTU protocol, and AUTO-STOP parity (which automatically detects the correct stop bits setting).
-
Check additional parameters: Set the remote Modbus TCP server connection, configure cloud server address, set the password, select product hostname to distinguish it in the router lists.
Step 5: Connect to Overvis Cloud (Optional)
Section titled “Step 5: Connect to Overvis Cloud (Optional)”Overvis Cloud provides remote monitoring and control through a web dashboard. The device label includes a QR code and PIN for quick setup.
-
Access Overvis server: Scan the QR code on the device label or manually enter the link from the label (format:
https://c.overvis.com/ABCD1234where the last part is your PIN). The link redirects to Overvis server’s login page. Optionally follow the Overvis link on the Cloud tab. -
Login or create account: Enter your credentials if you have an account. New users should create an account first.
-
Create Network: After login, Overvis shows the “Create Network” page. If you came from the QR code/link, the PIN is pre-filled. Otherwise, enter the PIN from the device label and click “Check connection.”
-
Verify connection status: Overvis displays the connection status — either “Connected” or “Device is not connected to the server.” If not connected, check that EM-482 has Internet access. The
SRVLED should turn on shortly after theWI-FILED. -
Configure your network: Give your network a descriptive name (a “network” represents your EM-482 plus all connected Modbus devices). EM-482 itself (unit ID
111) is added automatically. -
Add connected devices: Select your RS-485 device models from the dropdown menus and enter their Modbus addresses. Overvis creates device instances from templates matching your selections.
-
Test communication: Open a device page in Overvis and read its parameters to confirm real-time communication is working.
Troubleshooting cloud connection:
Device is not connectedat the server → Check Internet connectivity, review Cloud address in web interface settings- PIN not accepted at the server → Verify you entered the exact PIN from this device label
- Can’t create account → Ensure email address entered is valid, check email for verification link
Troubleshooting
Section titled “Troubleshooting”The PWR indicator is constantly red or blinking fast in red: This may be due to device malfunction. Contact the seller or manufacturer of the product.
The WI-FI indicator does not remain on, but is blinking rarely (every 3 seconds, for more than 2 minutes): The Wi-Fi access point is unavailable. Normal during first 30 seconds while the connection is established. If it persists, check the Wi-Fi settings, access point distance and that it is powered.
The SRV indicator remains off (for more than 2 minutes): EM-482 is not connected to the Internet. Verify the server connection address in the web interface. Your network firewall may be blocking outgoing connections. If the issue persists, check the router Internet access.
The WI-FI and SRV indicators keep blinking alternately: The EM-482 is in setup mode. Either complete the configuration, or exit the mode by pressing the R button on the front panel for about 3 seconds.
Cannot access EM-482 web interface: Check the EM-482 is in setup access point mode (the LEDs are blinking alternately). Check your device is connected to EM-482 access point. Use http://em.com or http://192.168.4.1 address to access the web interface.
Device already registered error at server: The device is bound to another Overvis account. Use the Unbind button (if it is in one of your accounts), or contact the server administration (or the previous owner) to remove the device from their account.
Intermittent connection drops: Check that the power supply voltage is within the required range (7-30V DC) and can provide sufficient current (up to 110mA). Look for electrical noise or interference sources near the device. Update EM-482 firmware to the latest version.
RS-485 devices not responding: Verify the RS-485 wiring is correct (A and B terminals). Check that the RS-485 bus termination is properly configured. Verify Modbus RTU/ASCII settings match the connected devices. See the Modbus Interface documentation for detailed communication settings.
Service Button Quick Reference
Section titled “Service Button Quick Reference”The R button functions depend on press duration:
Quick press: restart device
Hold 2-8 seconds: switch Wi-Fi setup mode on and off
Hold 8+ seconds: Factory reset (erases all settings)
What’s Next?
Section titled “What’s Next?”- EM-482 Operating Manual — Complete technical documentation
- Connections Guide — Network setup and security
- Modbus Interface — Protocol details and register reference
Need Help?
Section titled “Need Help?”For technical support and assistance:
- Email: support@overvis.com
- Support portal: www.overvis.com/support